Simplify complex information through PowerPoint decision trees and communicate effectively. In other terms, decision trees are a type of flowchart or a clear pathway to show decisions. PowerPoint decision trees are graphically designed visual elements to demonstrate the decision process. The decision tree starts from a node and ends on branches that show different potential outcomes of decisions.
Decision trees are widely used in fields like marketing, finance, engineering, etc. Moreover, selecting a decision tree is crucial because each possesses a unique purpose in different situations. Thus, finding a suitable decision tree is mandatory for better audience engagement and clarity. This article will highlight 6 top free resources to get high-quality decision tree PowerPoint templates.
In this article
Part 1. How to Make a Decision Tree in PowerPoint?
By using a decision tree, people can get concepts that are not from their relevant field. In addition, decision tree PowerPoint avoids uncertainty in information and saves time. Considering the benefits of making a decision tree, anyone can incorporate it using a step-by-step guide. Thus, below are 2 detailed methods explained to make a decision tree in PowerPoint.
Method 1: Create a Decision Tree in PowerPoint Using SmartArt
Microsoft PowerPoint holds a built-in SmartArt that enables you to communicate via graphics. To illustrate different ideas, there are a variety of designs and styles in SmartArt. Convert traditional bullet points into captivating SmartArt graphics. So, below is a step-by-step guide that will show how to make a decision tree using PowerPoint SmartArt.
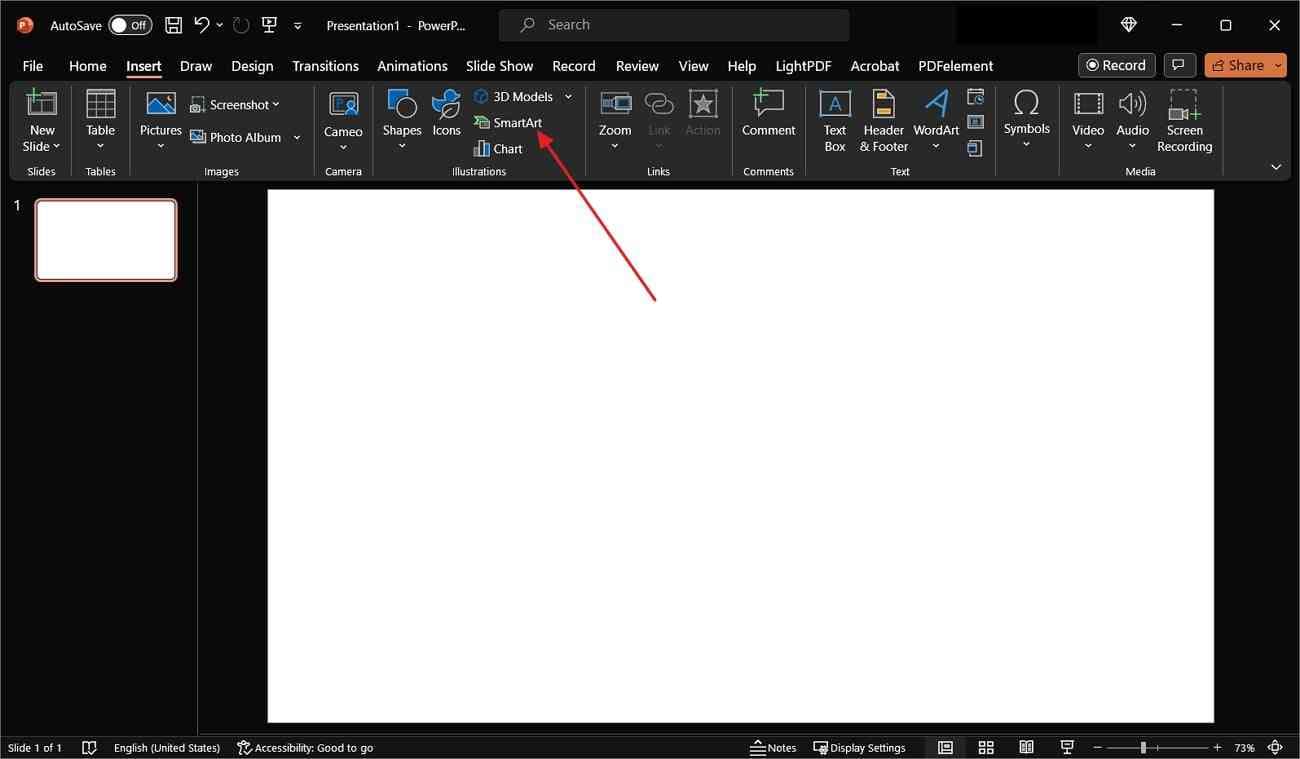
Step 1: Launch Microsoft PowerPoint on your system and get a blank slide. Go to the left side of the top toolbar and click "Insert." Next, In the “Illustration” section, choose the “SmartArt” option. This will open a new window named "Choose a SmartArt Graphic."
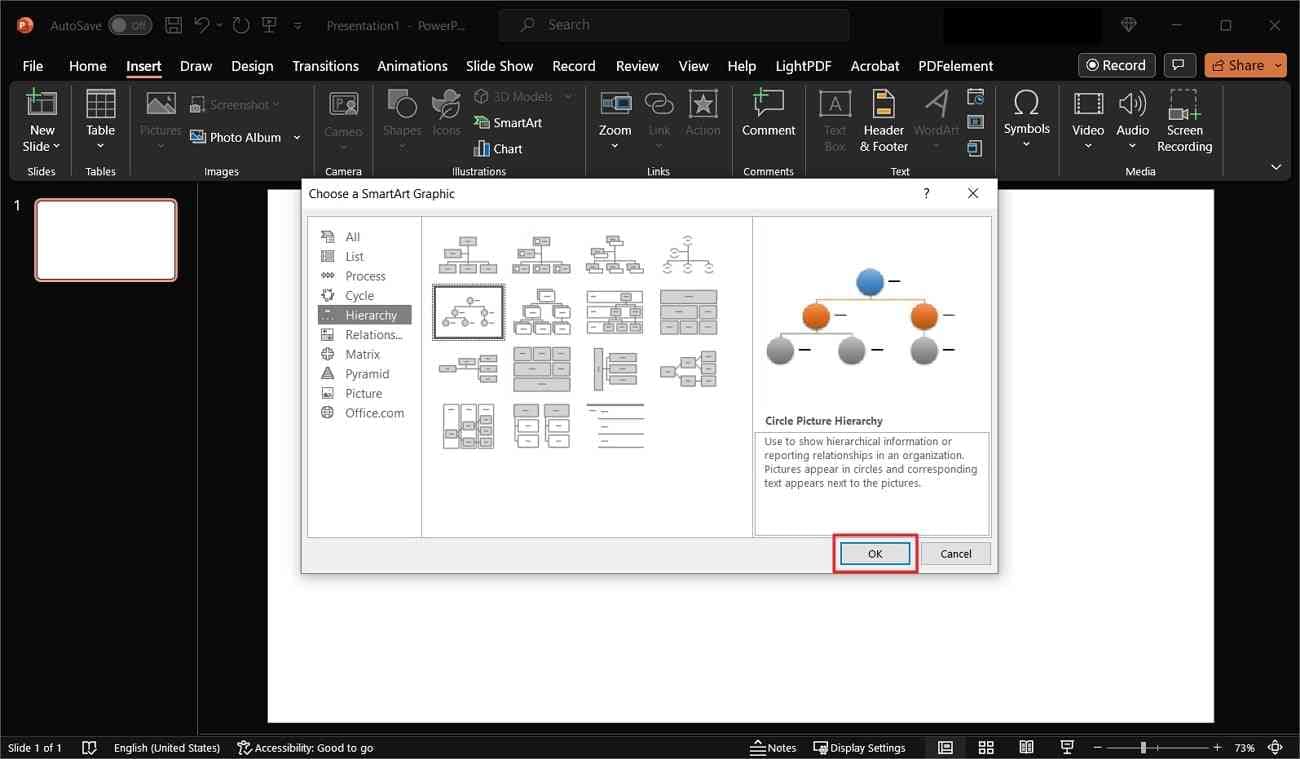
Step 2: From that displayed dialogue box, head to the left side and hit the “Hierarchy” option. Then, choose “Circle Picture Hierarchy” and hit the “OK” button located at the bottom of the dialogue box. Now, the SmartArt graphic will be added to your blank slide.
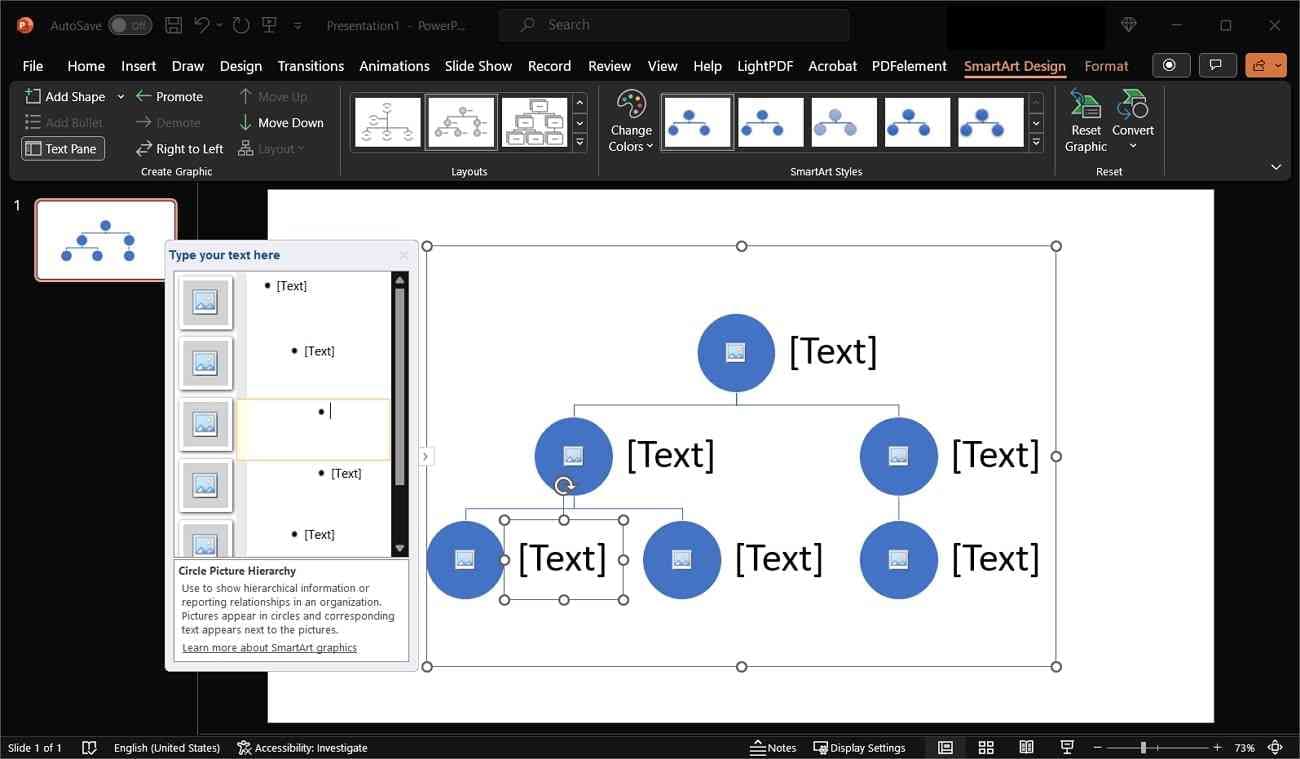
Step 3: Afterward, click on the SmartArt graphics that you added. There, an extended menu will open on the left side. From the Hierarchy boxes, press any text holder and type your desired text. Moreover, tap on the picture icon from the circle, and another window, "Insert Picture," will appear. Users can insert pictures from the given four sources in the window.
Method 2: Create a Decision Tree in PowerPoint Using Templates
Instead of making a decision tree from scratch, use a PowerPoint pre-designed template. Get a professional and consistent appearance of a tree diagram by using PPT templates. The probability of error gets reduced, and visual clarity is increased through templates of decision tree PPT. Let's use the tree diagram template in PowerPoint and learn via the detailed steps below.
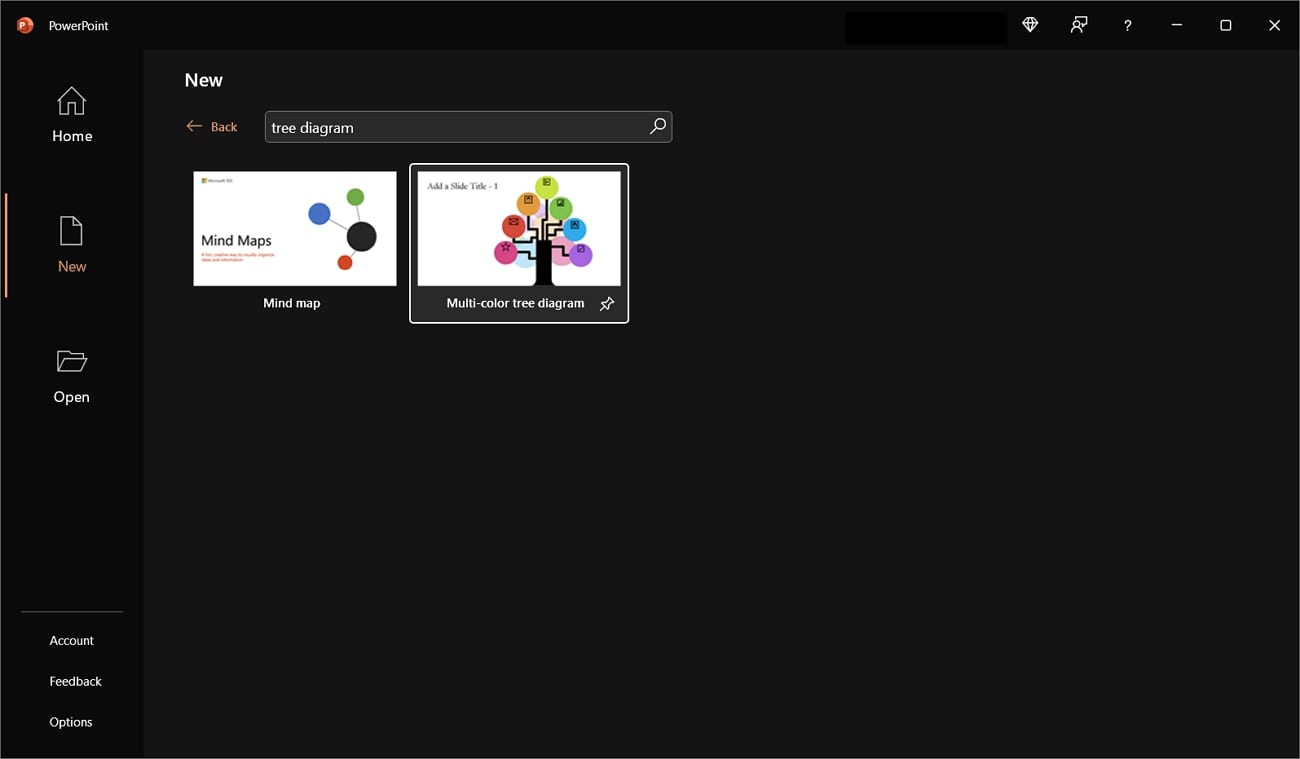
Step 1: Access Microsoft PowerPoint in your system and head to the "New" tab from the left panel. Head to the search bar in the "New" tab and type "Tree Diagram." Then, Press "Enter" from your keyboard and wait for a while. Later, templates of decision-tree diagram templates will appear. Select "Multi-color tree diagram," and a preview will open in a small window.
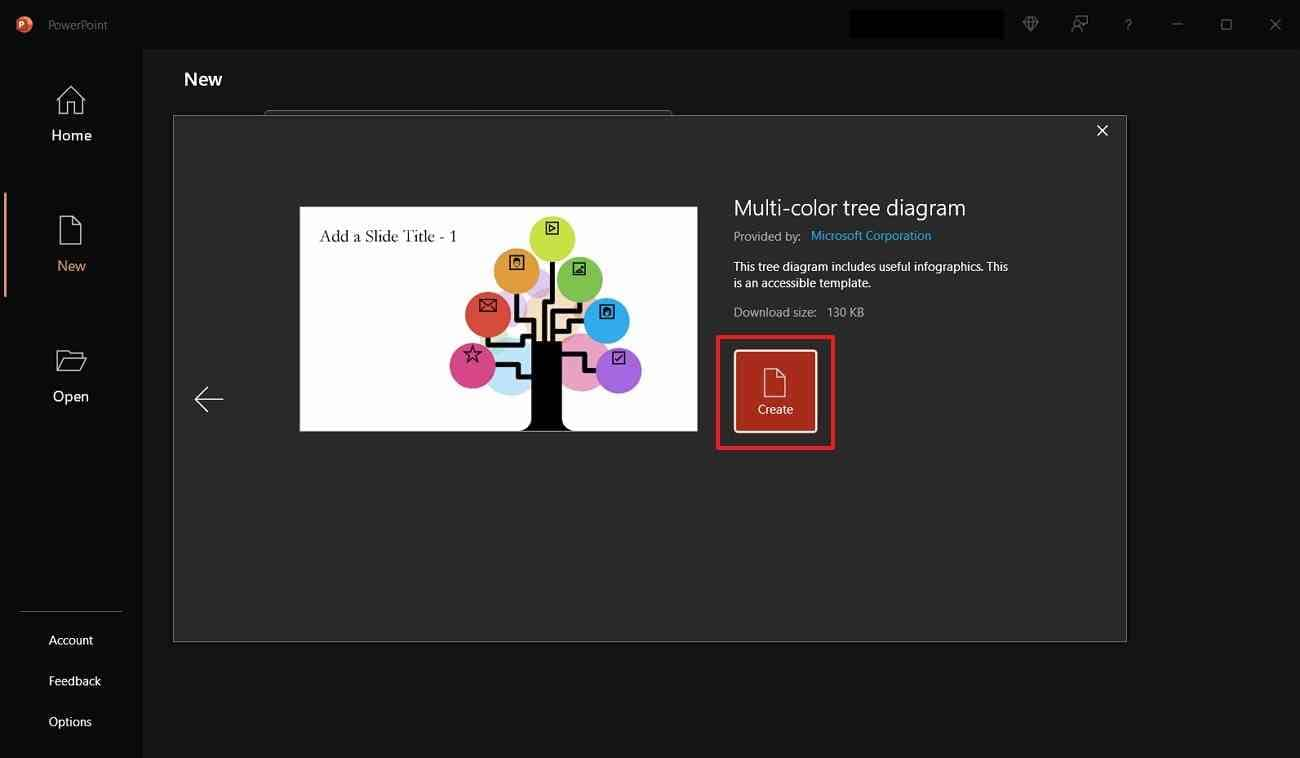
Step 2: Tap the "Create" button from that dialogue box, and the template will open in PowerPoint. Lastly, edit the PowerPoint template according to your preferences. Next, click on the text placeholders and enter your text in the decision boxes. Additionally, users can drag the icons and place them in their desired location on the slide.
Part 2. Best 6 Decision Tree Templates that Inspire You
Multiple decision-making trees for diverse topic needs are available that serve different purposes. There are classification trees, regression trees, and many more to meet specific goals. Instead of making decision trees from scratch, pre-designed templates can be used to ease the work. Considering the audience and scenarios, read and find below the 6 best templates for decision trees.
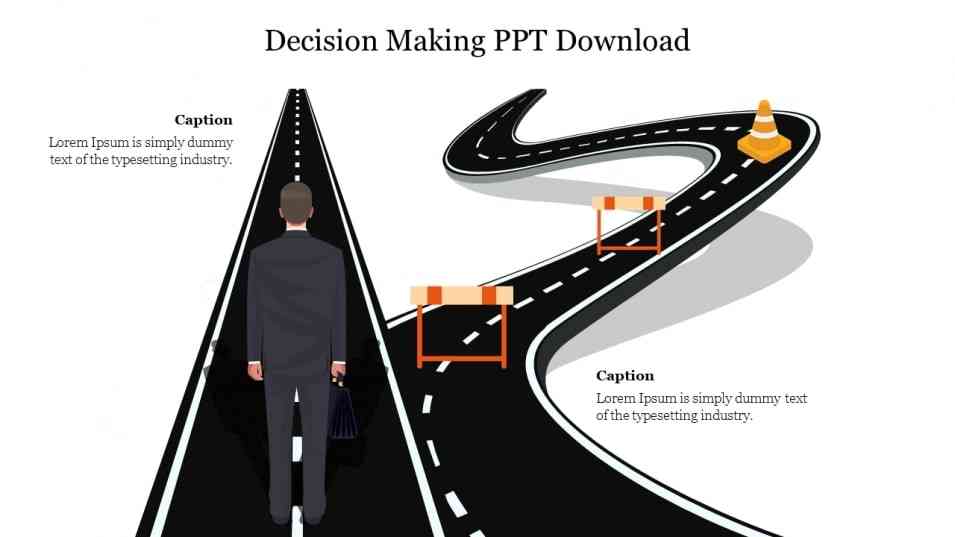
1. Decision-Making Bridge
Use this template and select the right course of action from the two alternatives. This decision-making bridge will display two different information and preferences related to the problem. Users can download this template in PowerPoint and Google slide format. The template supports 16:9 and 4:3 formats.
After downloading it for the required platform, customize and edit as needed. You can rearrange the elements separately or drag the whole bridge to the desired place on the slide. Moreover, it allows you to change the color of the bridge and the slide.
2. 7-Step Tree Diagram
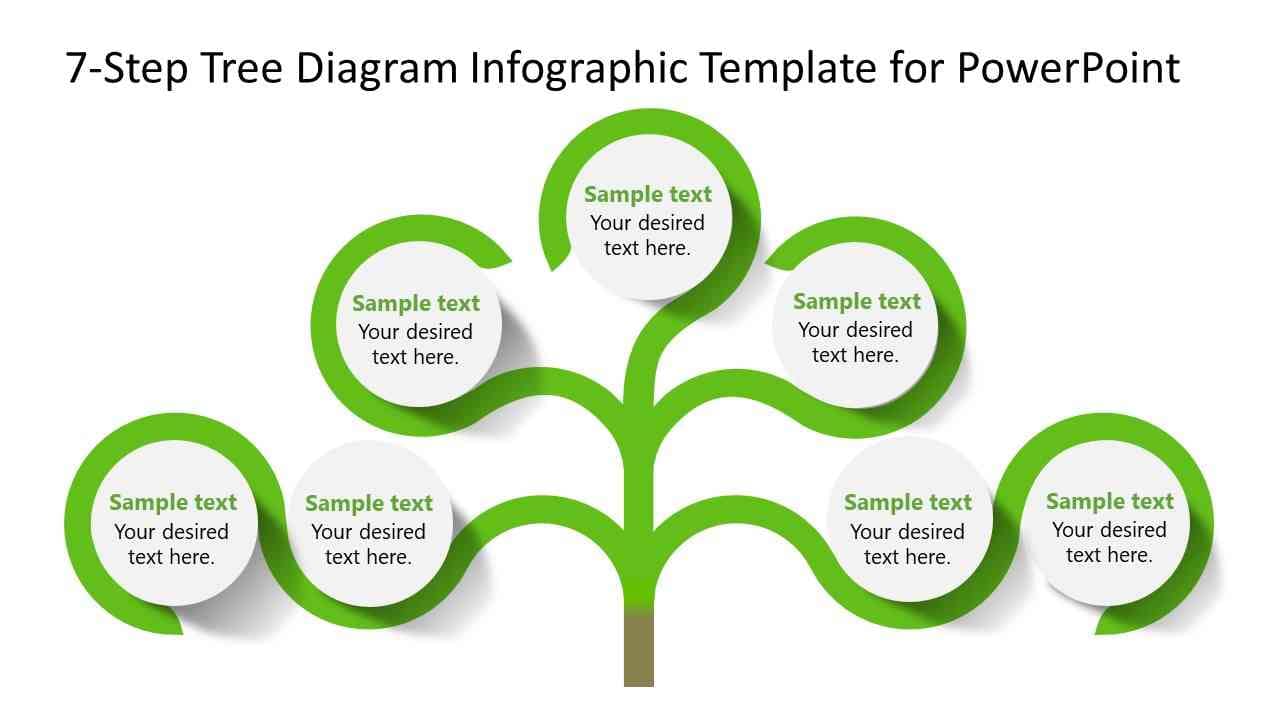
This decision tree diagram shows the hierarchy and connected process that facilitates better understanding. For example, users can demonstrate the growth process stepwise. This template is available with two color background variations to choose from.
A green-colored font is used to match the theme of the green-colored tree. In the tree, a single stem gives rise to 5 branches, from which 2 branches are on each side and 1 on the top. Circle curves on the tree provide a 3D effect to the illustration and prove appealing.
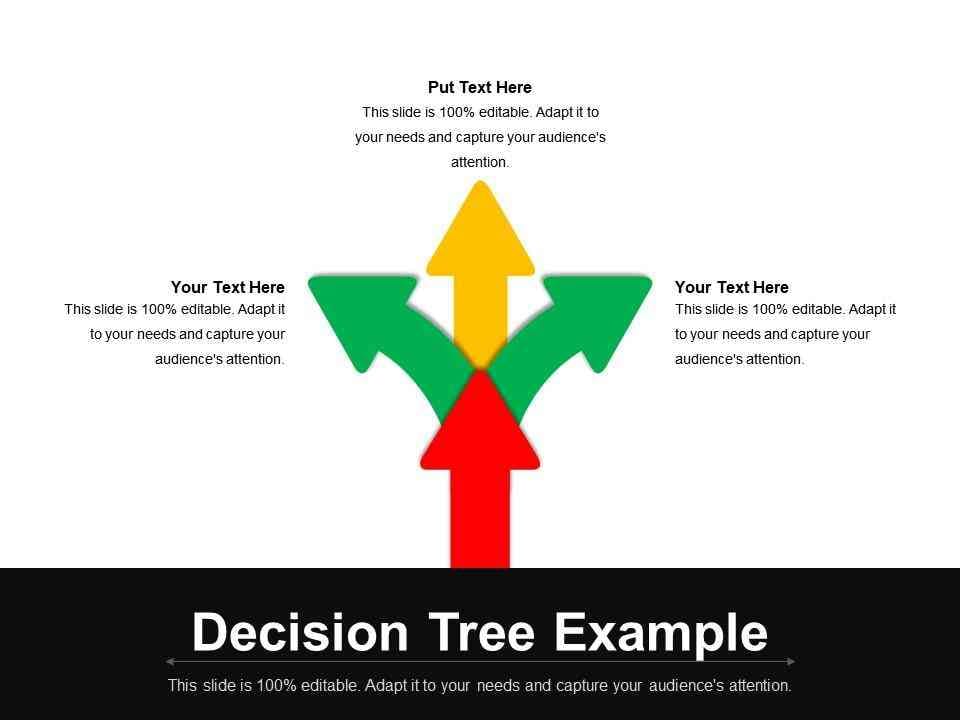
3. Decision Tree Example
Show the potential results of particular actions to your teammates by using this decision tree. Also, one can display related outcomes of any decision via this template. It is designed especially for retailers, manufacturers, and consultant professionals. This decision tree PPT is also compatible with Google Slides.
With high-resolution graphics, this template can also be exported in PDF, PNG, and JPG formats. Users can edit the decision tree's shape, size, color, and position as the template is 100% editable. In addition, you can add or replace icons that correctly align with your message in the tree.
4. Decision Tree Diagram
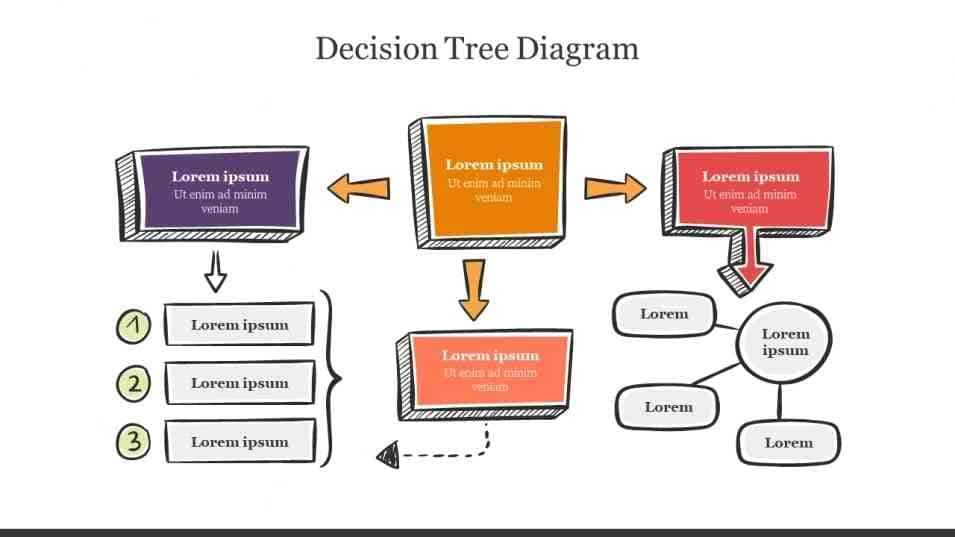
Impress business investors with an attractive diagram to explain concepts. This decision tree template PowerPoint is highly used for business purposes because of its flowchart design. It provides a detailed solution or outcome of problems more simply and engagingly. Users can also change the color of slides and elements in the diagram.
To customize it fully, you can relocate the shapes accordingly in the slide. The diagram holds 4 main rectangles and square shapes elements. Those elements are further directed towards steps and points with the help of pointing arrows.
5. Infographic Tree Diagram
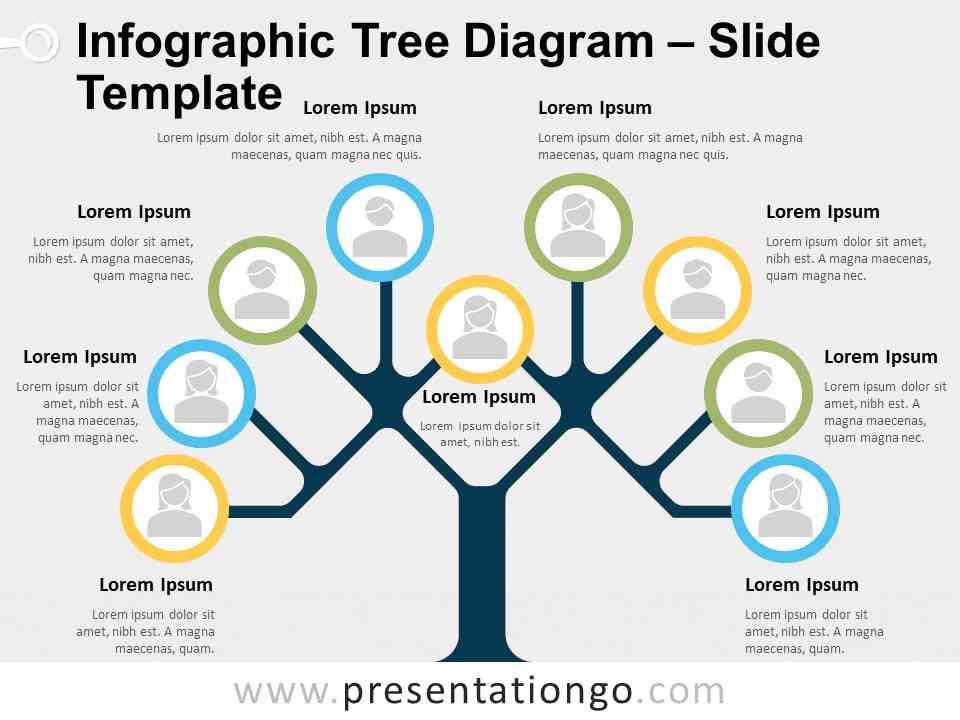
Tree infographics present numbers, stats, and certain essential facts. This template featured a clean design with lines and 9 colorful circles. It is a well-crafted design to download in PowerPoint and Google Slide formats. Users can download in 2 different displays as light and dark-colored layouts. Moreover, it provides complete editable texts, icons, and shapes.
There are colored outline circles in the tree that hold male or female profiles inside. One person's profile is at the center, while the other 8 profiles appear on both sides. The tree is perfect for visualizing the company and its employee's descriptions.
6. Tree Diagrams
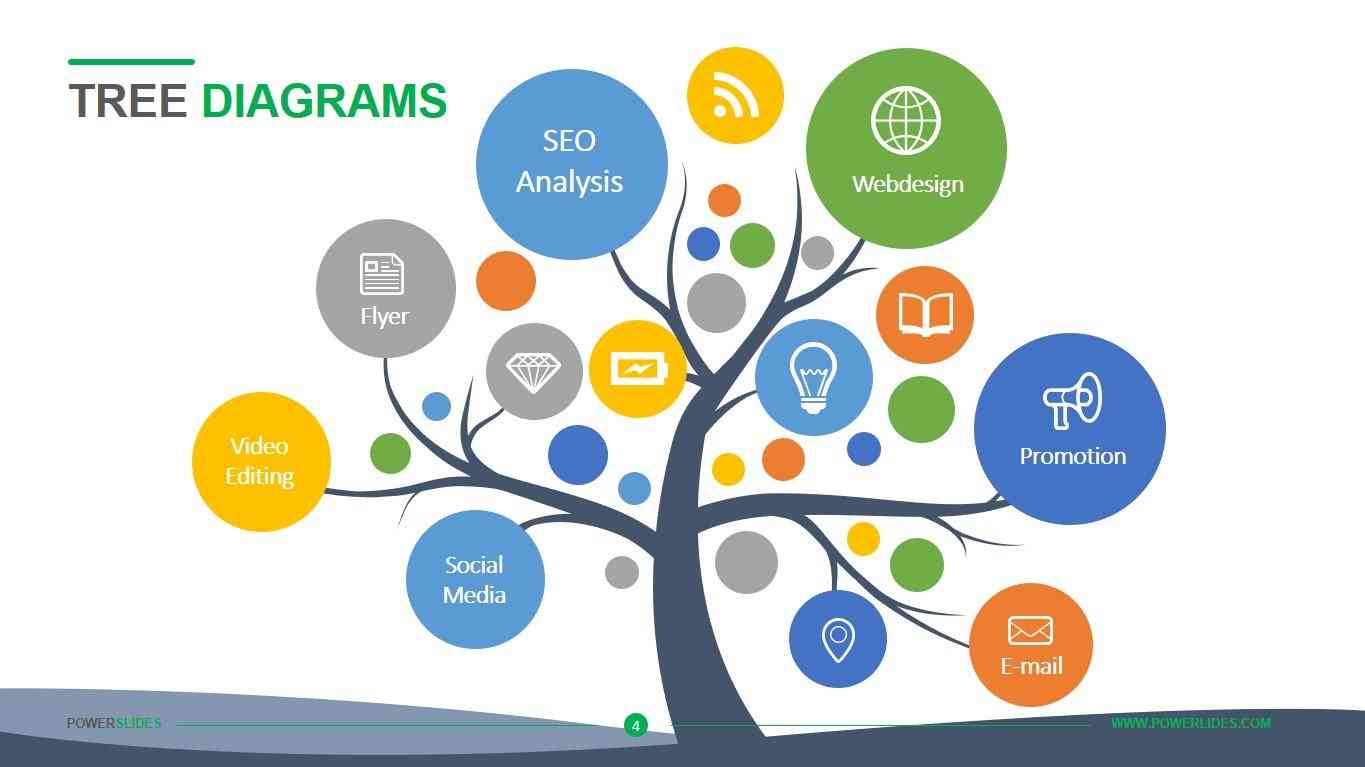
Visually represent complex with a unique pack of tree diagrams template. Use organization charts and family trees to represent cause, effect, and growth. In the 1st slide, steps can be explained on the leaf, with the conclusion on the top. The leaves on the second slide can be used to label concepts.
Leaves, stems, and branches in the third slide can be illustrated as the growth of something. The last slide contains a tree with colorful branches representing types of certain concepts. This pack of tree diagram templates is supported in PPT 2010, 2013, and 2016 versions.
Bonus Tip: Enhance your Decision Tree Presentation with Presentory
Communicate effectively by breaking down complex data into visuals and graphics. For this purpose, Wondershare Presentory is helpful in visually enhancing your decision tree. It is an innovative AI software that makes presentations for any platform in any format.
Users can make appealing and professional presentations to display in any sphere. Moreover, this AI presentation maker software provides a 14-day free trial with 1500 AI credits that you can use to create compelling and unique presentations efficiently.
Key Features of Presentory
Make a smooth presentation that attracts the audience and saves your efforts to create it. However, explore this AI tool better through the below-mentioned key features:
- AI-Generated Presentation Outlines: This AI tool accurately generates your presentation outlines. By getting the prepared content, presenters get enough time for content delivery rehearsal. Simply input the presentation topic or keywords and get organized content. Later, the content can be added to the desired slide template with just one prompt.
- 2000+ Resources for Multiple Occasions: Presentory holds 2000+ library resources for different purposes. These resources can provide ease to the presenters from education, business, or any field. Among those resources include text, stickers, and slide backgrounds of any type. One can choose bookshelves, meeting rooms, and many more from the slide backgrounds.
- Rich Animations and Transitions Effects: Multimedia in the presentation improves the viewer’s interest and memory. This AI application contains unique animation and transition effects. By using these effects, presentations became breathable. From the animations, there are appear emphasize and disappear effects. With a single click, you can add transitions to all slides in the presentation.
- One-Click Recording: Presenters can record videos without getting worried about messy backgrounds. This AI tool allows users to change the background and layout of the video. In the video, you can also adjust brightness and video quality as needed. Furthermore, there are multiple beautify filters that you can use to remove the blemishes from the face during recording.
- Stream at Popular Platforms: This AI software can be used to live stream on popular platforms. It contains attractive built-in templates to stream online at conferences and meetings. Presenters can record videos side by side with their presentation slides. Get globally connected and live stream online with a single click.
Steps-by-Step Guide to Using Presentory to Create Compelling and Informative Presentations
This AI tool has numerous powerful features that make presentations impactful. It contains a user-friendly interface, but this guide will explain in a more detailed way how to use it:
step1Access Create with AI Option
Download the app through the official website of Wondershare Presentory. Launch this AI software on your Windows PC and sign in to start creating projects. There, access the "Create with AI" feature to use the Presentory AI tool.

step2Add the Details for Creating AI Content
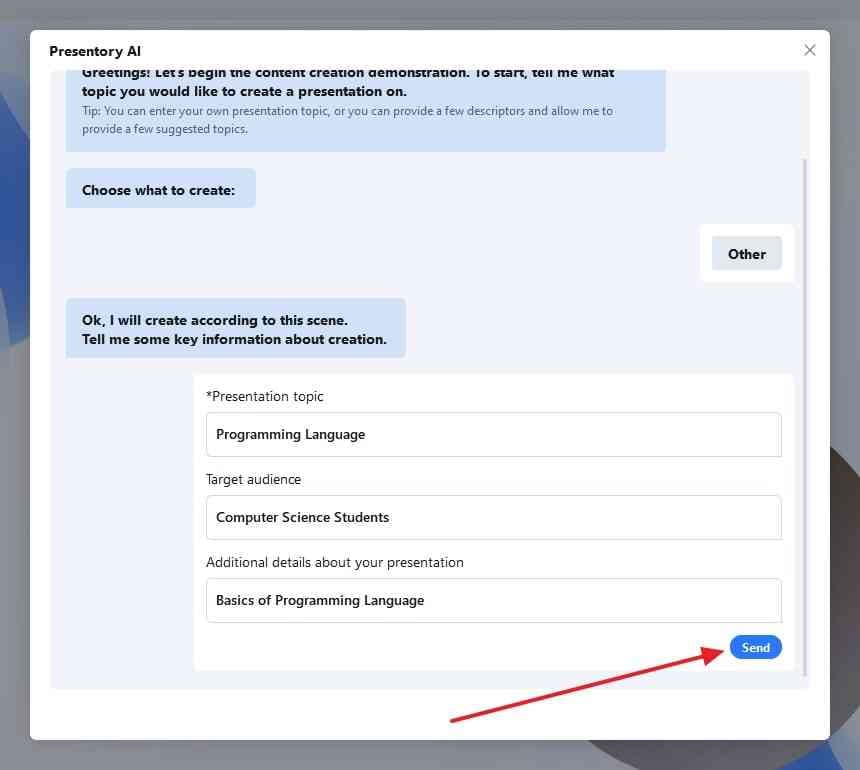
Presentory will ask you to select the topic category on which you want to generate the content, such as Courseware and Knowledge Sharing. You can tap the "Other" option to add the custom topic details. Click on the "More Details" option to add information like target audience and additional details, then press the "Send" button.
step3Choose the Template to Create an AI Presentation
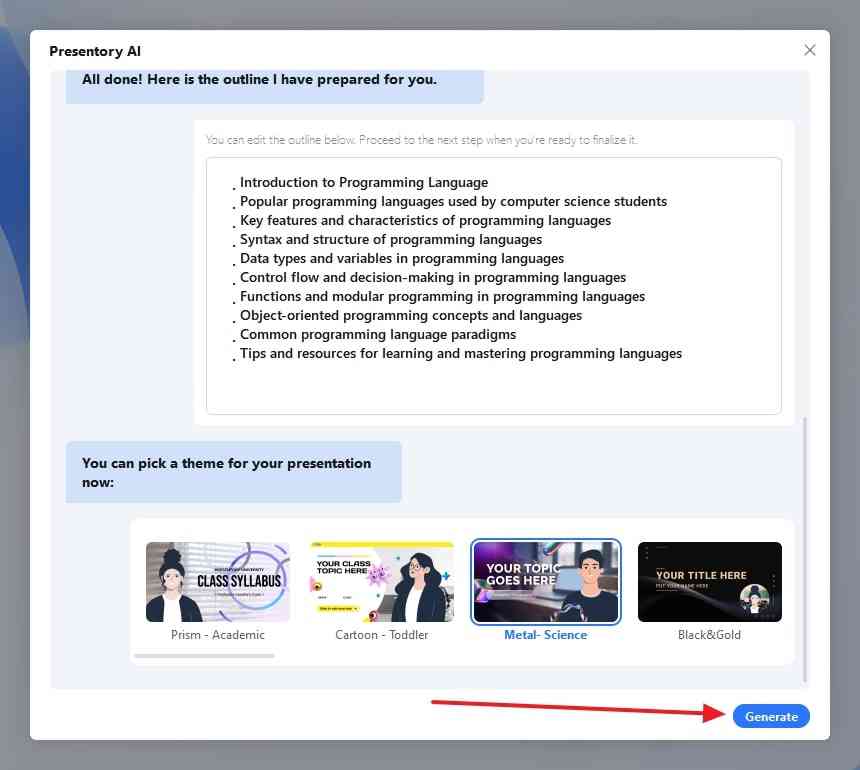
In a matter of seconds, Presentory will generate an outline for you to confirm. If you are satisfied with the outline, press the “Continue” button and choose the desired template for your presentation, such as Metal–Science. Afterward, click on the “Generate” button to initiate the process of creating the presentation.
step4Add Animation and Customize the Presentation
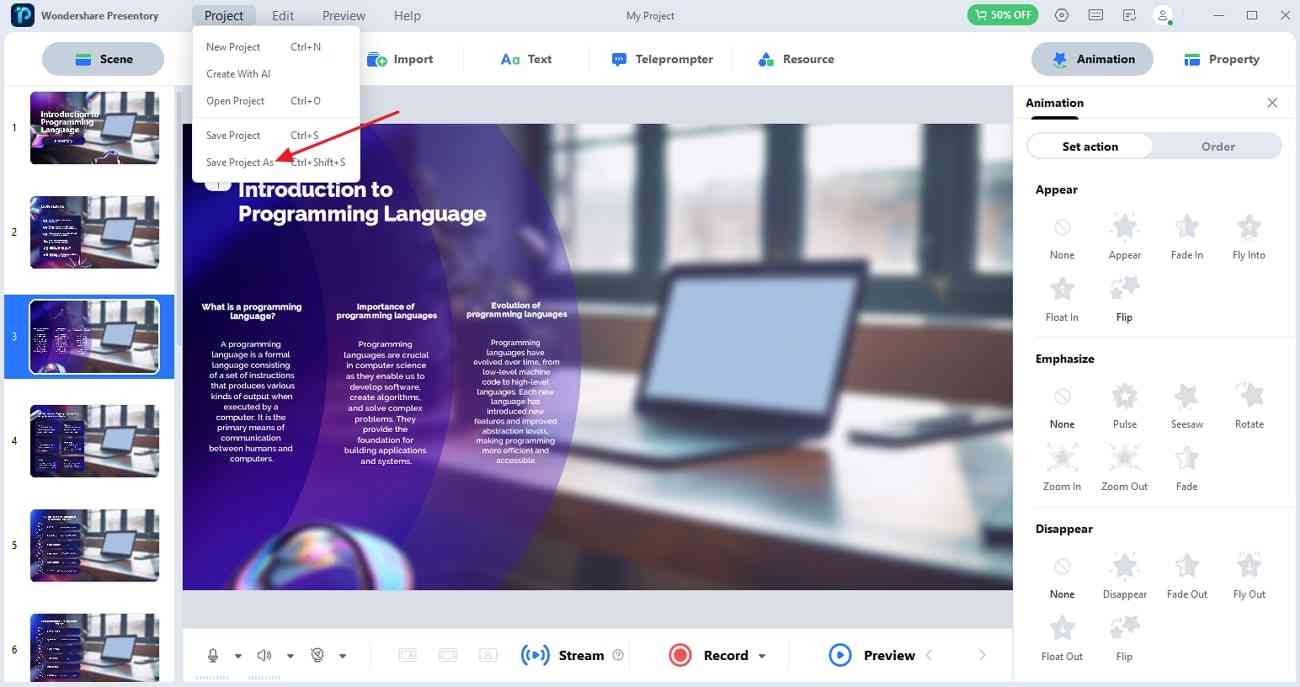
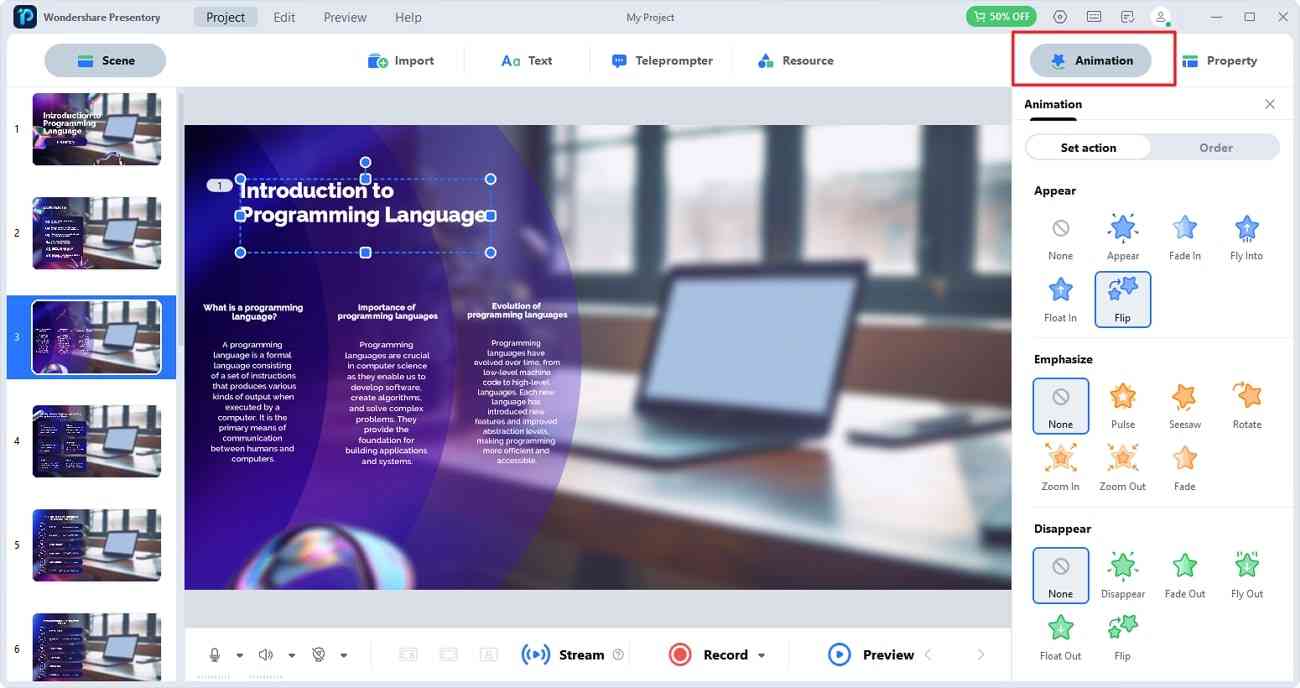
Afterward, wait for a while until the content gets added to the slides. Select the object you want to animate and move to the top toolbar. From the toolbar, hit the "Animation" button and go to the right-side bar. From the animations, select any one of your choices. For example, click "Flip" from the "Appear" section, and the animation will be added.
step5Export your Project to the Desired Place in the System
Later on, customize animation on different objects, texts, and diagrams. After editing completely, move to the top toolbar and access the “Project” option in the left corner. From the drop-down menu, click on “Save Project As.” Now, choose the location in your system and save the file there.
