Visuals in PowerPoint enhance overall communication through presentations. To simplify complex data, visuals in the form of charts, graphs, images, and 3D models are used. At a certain point in the presentation, these elements evoke emotions and support arguments. Visual elements like diagrams and SmartArt help organize the presentation's content.
3D models are the digital representation of objects in three dimensions. Considering the importance of visual elements, PowerPoint 3D models were designed. Integrating 3D models in PowerPoint presentation enhance audience engagement. In this article, we will show how to enhance your Presentation with 3D models for PowerPoint.
In this article
Part 1. Why Use 3D Models in PowerPoint Presentations?
Complex ideas are challenging to convey in 2D models and simple presentation content. Therefore, 3D models for PowerPoint are used in presentations. 3D models can be applied to scientific data, product marketing, architectural plans, etc. These PowerPoint models hold many benefits, but we are going to discuss a few in detail below:
1. Enhanced Engagement
By visualizing data, viewers remember the text for a longer period. 3D models hold interactivity layers to capture the audience's attention. 3D models are used to ensure engagement, particularly in the educational and training fields.
Despite pre-made PowerPoint 3D models, one can create and modify 3D models as needed. Insert models and get a professional impact that enhances the credibility of the presentation. Viewers are usually inspired by technology like 3D models that consequently increase interactivity.
2. Improved Understanding
If you are introducing the structure and features of any product, 3D models are surely for you. For instance, 3D models allow users to explore the product by rotating it to show all components of the product. PowerPoint 3D models remove misinterpretation of any concepts in the presentation.
Historical buildings and artifacts can be better explained by using 3D models. The dynamic nature of 3D models presents information in a storytelling way. When the audience gets to see the subject from various angles, they retain it in memory.
3. Professionalism
PowerPoint 3D elements represent professional and high-quality content in the Presentation. Also, it gives a tech-savvy look that further creates a favorable impression for viewers. In the academic and corporate sectors, your presentation stands out from others with 3D models.
Using 3D models shows you are updated with the latest methods and technologies. When 3D objects are thoughtfully used within content, it contributes to professionalism. One can make a PowerPoint 3D model of the branding logo to show commitment to the brand.
Part 2. How to Find and Insert 3D Models in PowerPoint Presentations?
As a student or business professional, 3D models might be essential in presentations. They are developed with cross-platform flexibility to run on any platform apart from PowerPoint. Inserting PowerPoint 3D models contains several benefits, as we have highlighted. Let’s explore practical steps to insert 3D models in PowerPoint from files and online resources.
1. Insert 3D Models From a File
The internet is full of 3D model templates to download for any use. These models can be directly inserted into presentations and documents. Inserting 3D models is as easy as inserting an image into a PowerPoint. So, below are the detailed steps to insert 3D models from files:
Step 1: First of all, double-tap to the PowerPoint file that you want to insert the 3D model. Select a blank slide, head to the top Toolbar, and click the "Insert" option. Next, explore the "3D Models" button with a 3D cube icon on it.
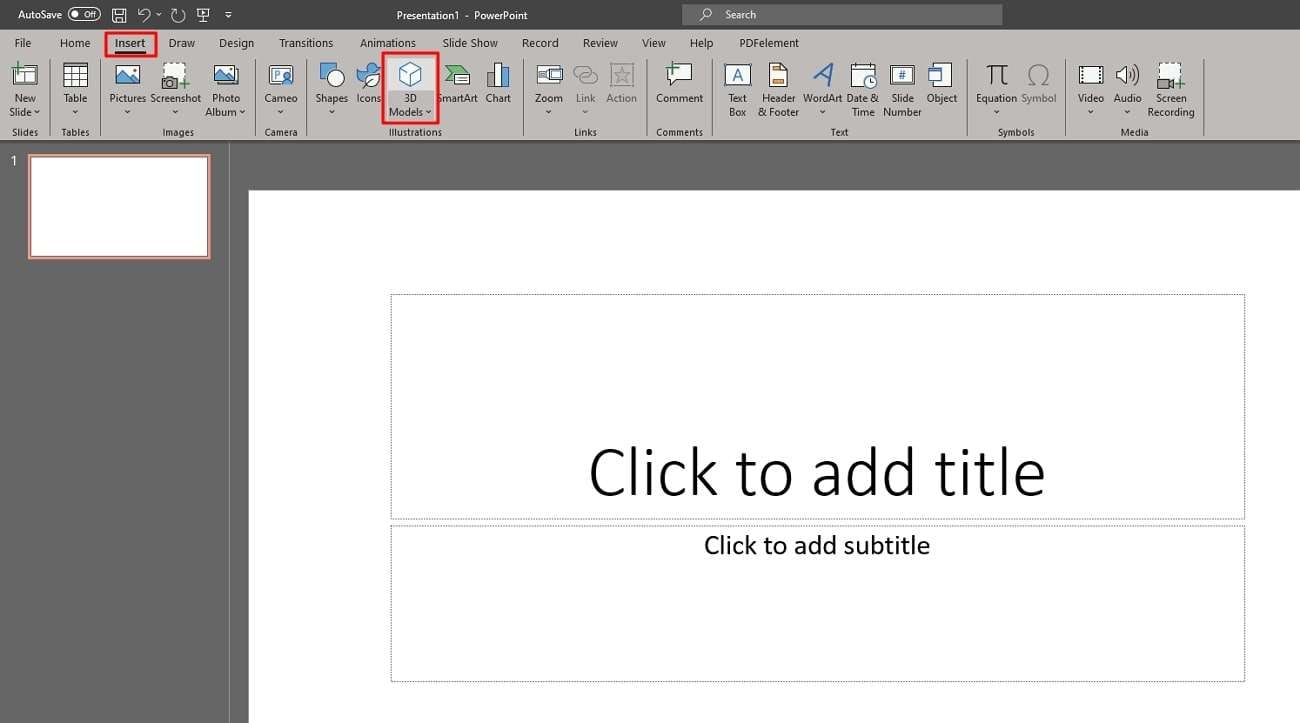
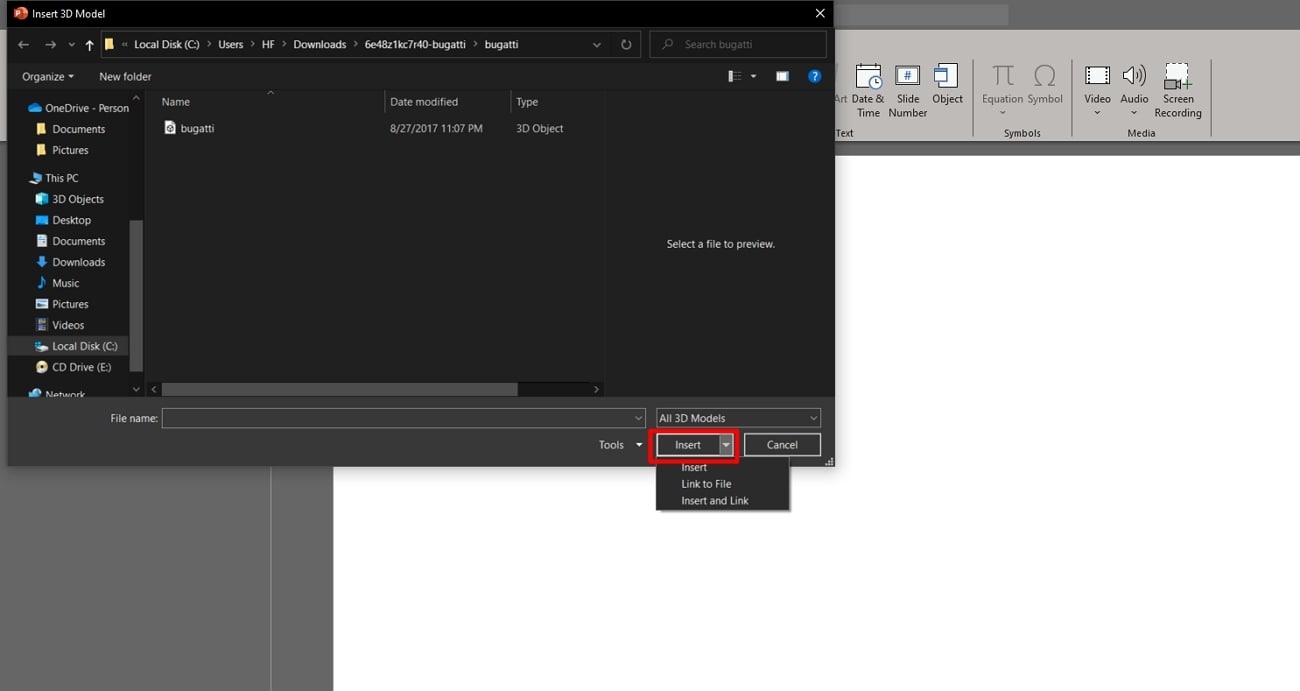
Step 2: Press the "3D Models" button and choose "This Device" from the drop-down menu. From the next window, go to the system location where you have saved the 3D model file. Choose the file and click on "Insert" there.
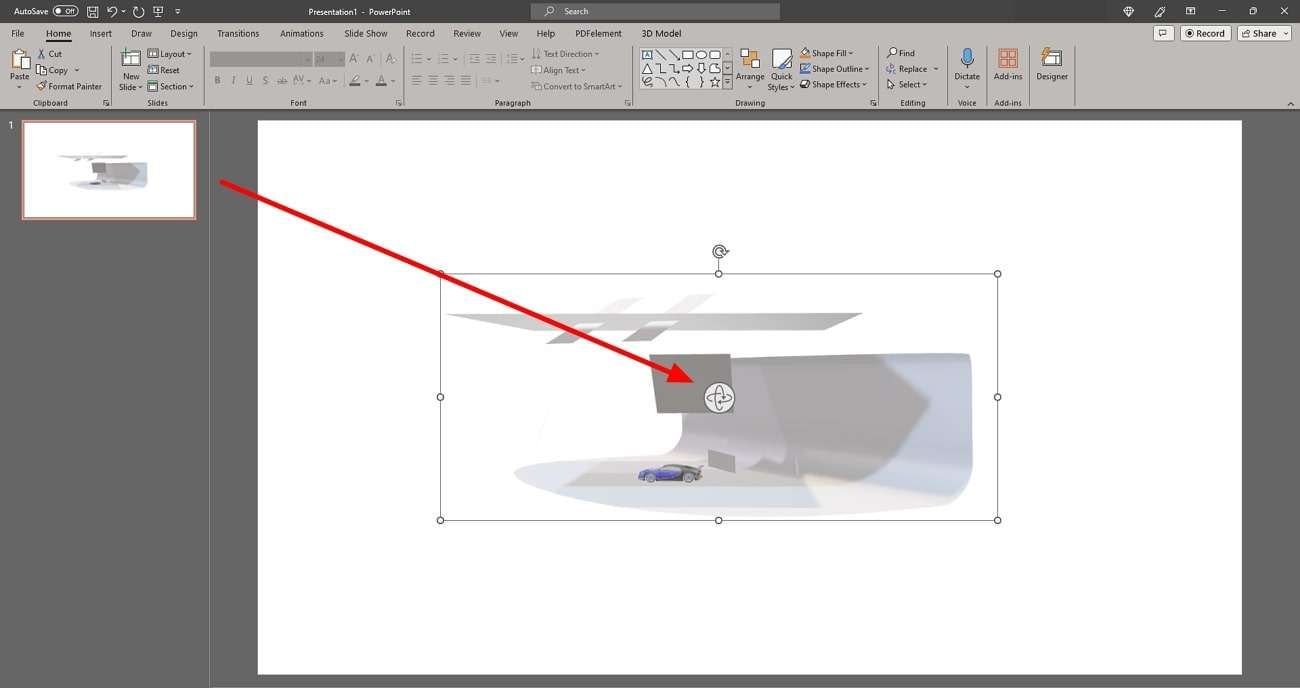
Step 3: Bring your cursor to the icon in the middle of the 3D model. Next, tap and hold to move the 3D model in any direction with its present location. By doing this, viewers can see its dimensions.
2. Add 3D Models from Online Resources
PowerPoint itself offers a variety of 3D model resources to add to presentations. It saves time and resources spent searching 3D model templates from the Internet. Now, let's explain the step-by-step process of inserting 3D models from PowerPoint resources.
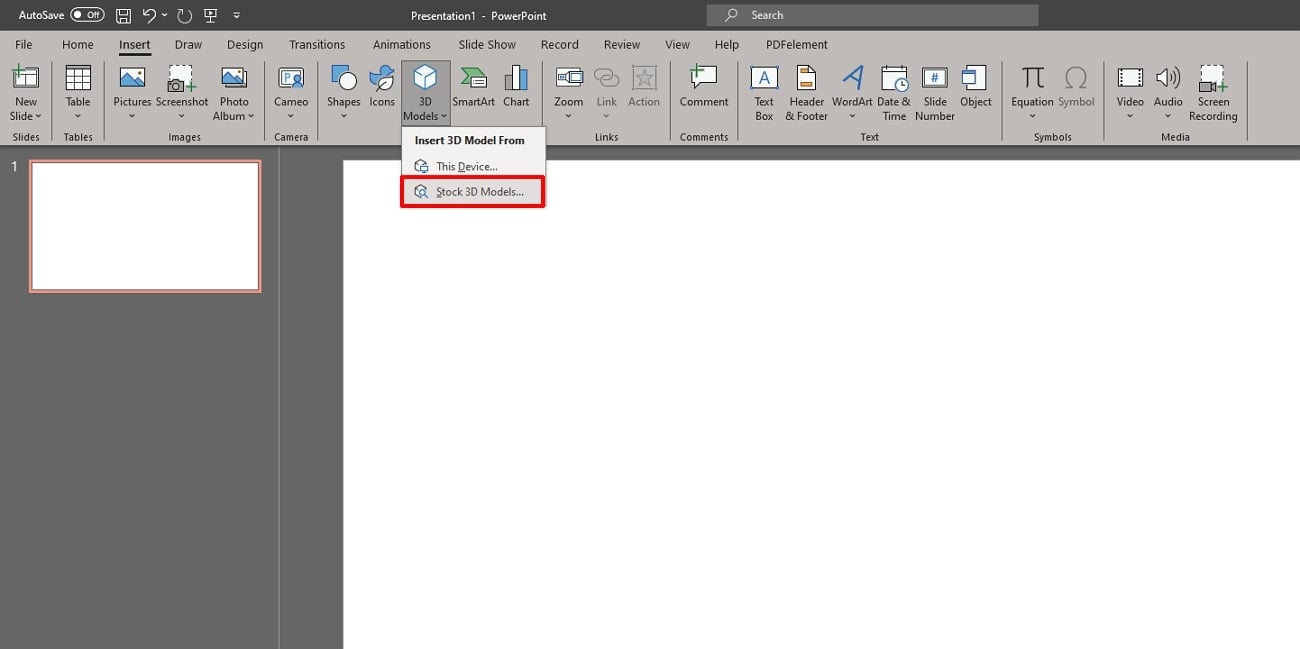
Step 1: Access Microsoft PowerPoint and get a blank presentation slide. Afterward, move to the top Toolbar and click the "Insert" button. Look for the “3D Models” option, where you have to select “Stock 3D Models” from the drop-down.
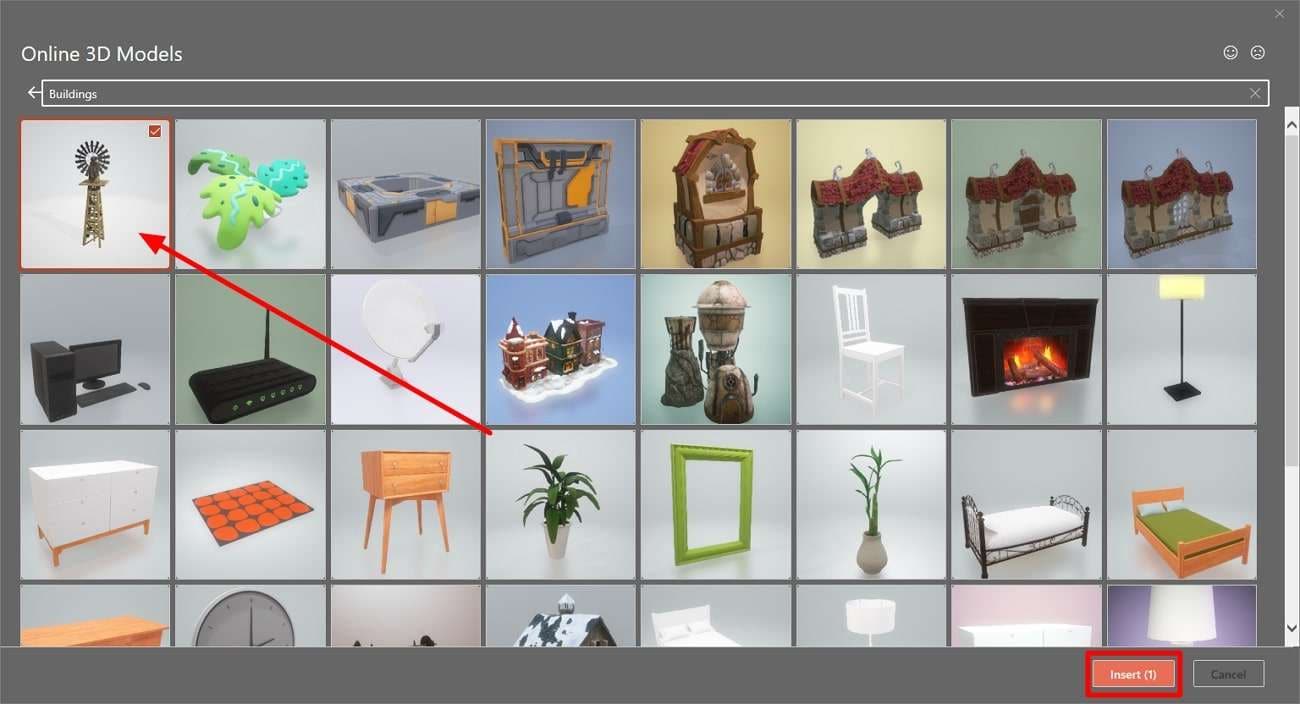
Step 2: Another window will open there named "Online 3D Models." Select any option from a range of 3D model varieties. For instance, we choose "Buildings" from the option and click on it. Later, building-related models appear, select any one, and press the "Insert" option.
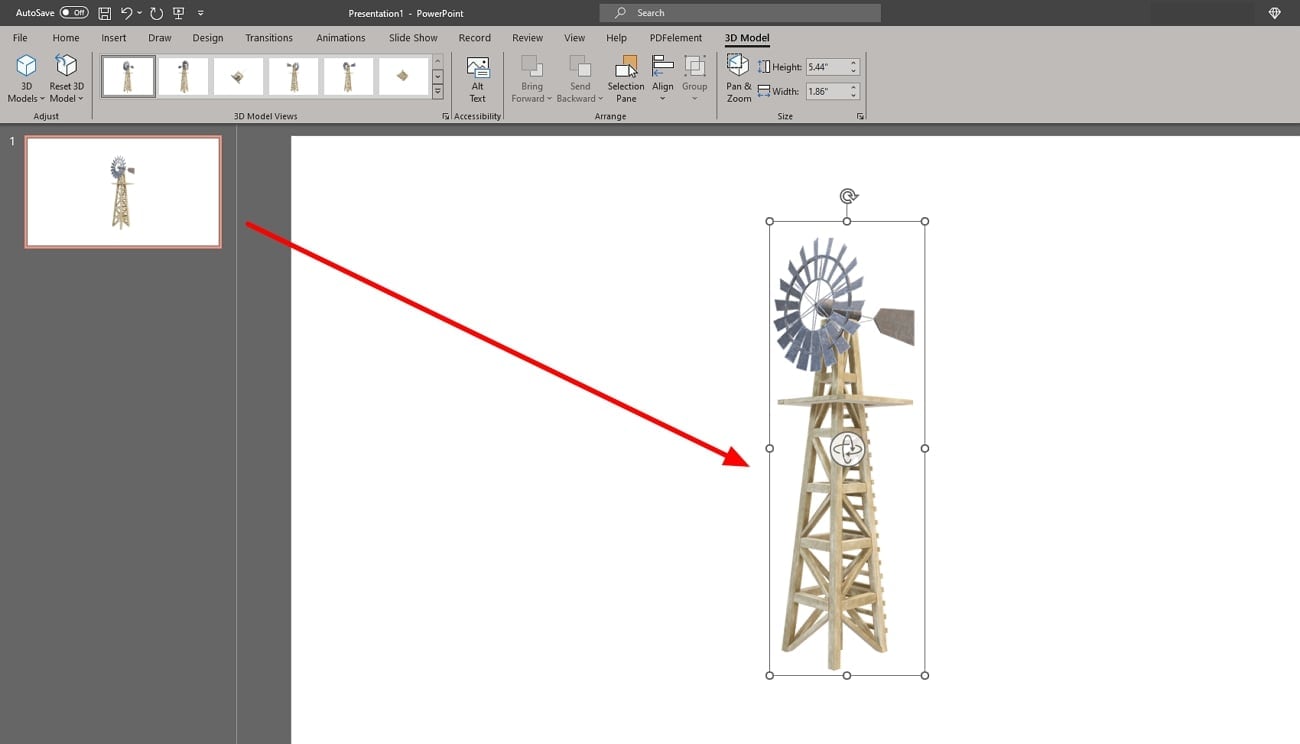
Step 3: Wait until loading, and the model will be added to the slides. Now, you can drag the corner of the 3D model's box and adjust the size. Also, double-tap and hold the 3D model to drag it to the desired location in the slide.
How to Customize 3D Models in PowerPoint
As you have learned to insert PowerPoint 3D models by using files and online resources. Now, let’s customize 3D models to get a more in-depth view:
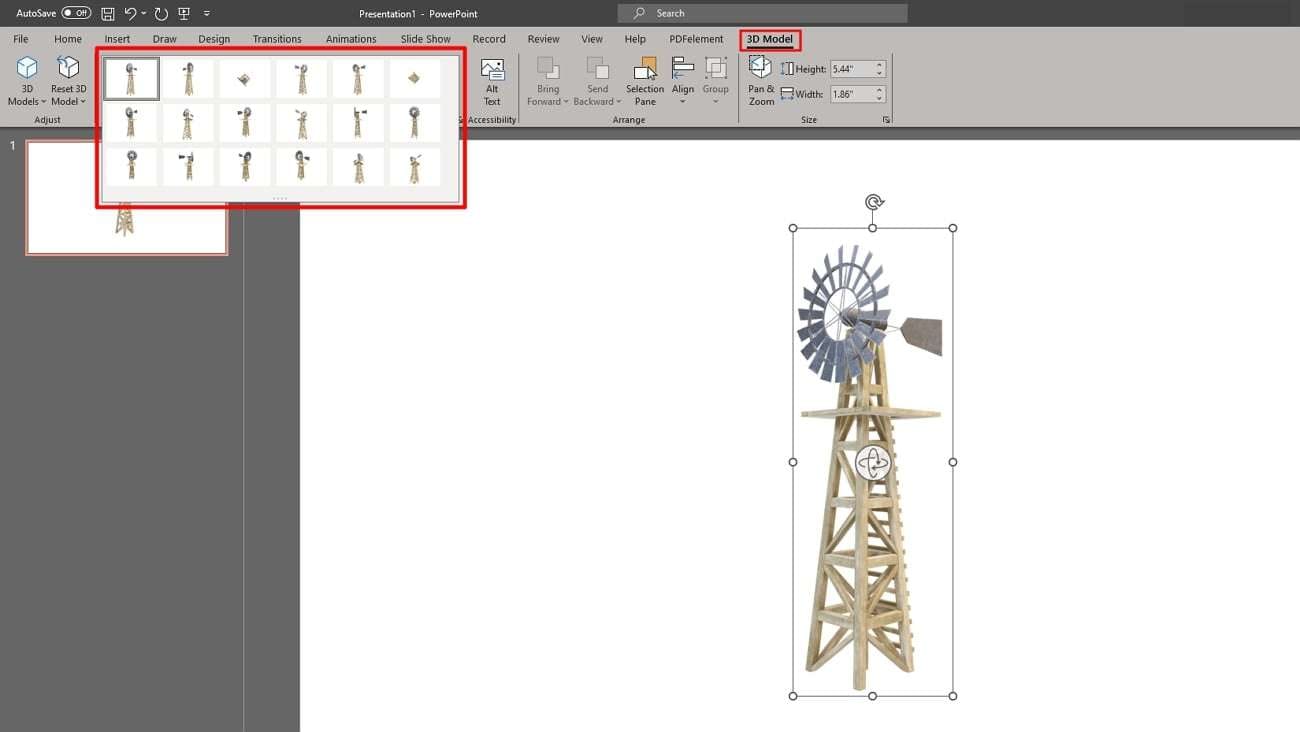
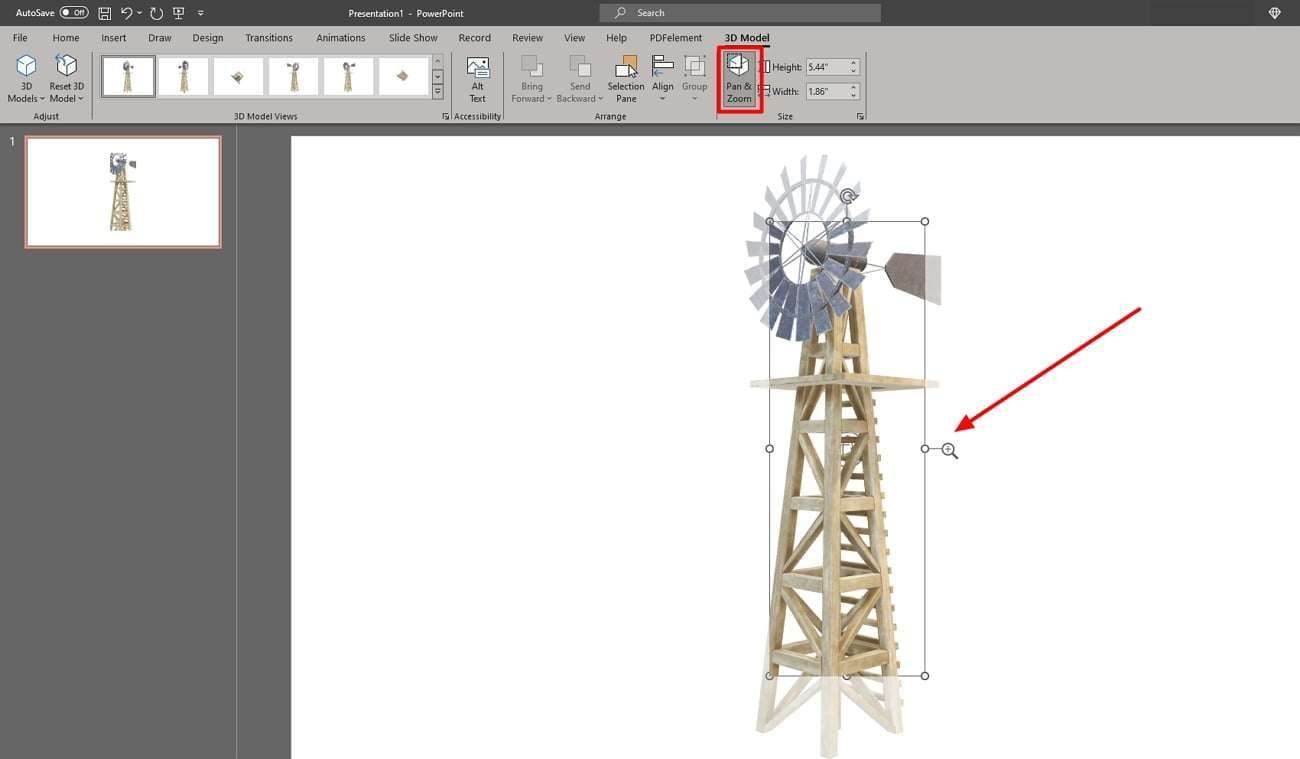
Step 1: After adding your 3D model, head to the top toolbar. Explore the "3D Model" option next to the “Help” option. There will be a section of “3D Model Views” containing different dimensions of the model. Expand the section and select any angle you want on your model.
Step 3: Alongside, there will be a “Pan & Zoom" icon button on the right side. Click on it, and a magnifier icon will appear on the right side of the 3D model. Place your cursor on the icon and drag upward to the zoom-in model. Also, you can drag downward to zoom out and reduce the model's size.
Part 3. Tips for Effective Use of 3D Models
The effectiveness of PowerPoint 3D models depends on how well you use them in the slides. It is suggested not to overcrowd your slides with 3D models, as it negatively impacts them. Moreover, larger file sizes of 3D models can slow your presentation. Therefore, below are certain tips that you must follow while using 3D models in a presentation:
1. Aligning with Content
Consider relevance a key to success while using the 3D model in the presentation. Avoid using models just for decoration and choose ones that contain a message. Before adding the model, provide a context for the audience to make a connection. Moreover, users must add annotations near the model to highlight its important features.
Visual consistency is also an important factor in the presentation. Throughout the presentation, choose 3D designs that align with the designs and color schemes of the template.
2. Animating 3D Models
Bring life to your presentation and make the 3D models moveable. Plan suitable animation effects to use in your 3D models. For example, you can animate planets to show their orbits when presenting on the solar system. To emphasize key points and features of the model, users can apply an effect to some parts of it.
Adjust timings, durations, and sound of animations to ensure they align with the content. In addition, it is recommended to avoid overwhelming animation effects on 3D models.
3. Incorporating 3D Models into Your Story
Create a flow and integrate 3D models in slides with proper strategy. Suppose you are presenting on cell biology, and then imagine using a cell mitosis 3D model. Using a narrative-like model will create a memorable impact in getting concepts.
Introduce the model gradually and explain the back story in detail, which will inspire. To maintain consistency in storytelling, add a smooth transition between slides holding models. Ensure a natural flow in transition and draw attention to details by animating them.
Bonus Tips: Make an Attractive Presentation with Diverse 3D Models
Do you want to make a captivating presentation using 3D elements and models? Consider Wondershare Presentory as a solution there. It is an AI-built-in presentation-making tool that holds innovative features. This AI tool lets users connect with the virtual world and stream presentations on popular platforms. It holds numerous stunning 3D-looking templates for presentations.
For marketing, education, or any other information-sharing purpose, this AI tool was designed. Present like a professional and get AI-generated content with this tool. Your data security is their priority; thus, Presentory offers cloud services to save projects in the tool. All in all, this AI tool is a perfect package for your needs. So, let’s discover its features to better understand its useful functions.
Key Features
Keeping in view of the diverse technological needs of the audience, this AI tool was explored. It holds numerous undiscovered features that can fascinate the presenters. Read further and unlock the advanced features of this AI application.
1. Polished Template Designs
Like 3D models for PowerPoint, users can make overall 3D presentations with just templates. This AI software offers built-in template designs that hold 3D elements in them. Those attractive slides are designed for any purpose or topic to present. Templates are fully customizable, as users can rearrange and resize their elements.
2. Recording and Streaming at Popular Platforms
Have you ever imagined that you could present at conferences with enhanced facial features? This AI tool enables users to streamline presentations on popular platforms. While presenting and recording videos, users can remove blemishes and apply makeup to their faces. Moreover, presenters can adjust the brightness and quality of the video.
3. AI-generated Outlines and Content
Still spending time searching content for presentations in this AI era? Update and equip yourself with Presentory because it offers AI-generated content features. With this AI feature, users must insert a topic, and well-researched content gets generated. Plus, content can be added to the slides with just one prompt, which saves manual effort.
4. Rich Animation and Transition Resources
Animating 3D models makes the Presentation speakable itself. In this AI tool, there are rich resources to animate objects, texts, and models. From its library resources, you may find unique transitions of slides. It allows users to add transitions to all slides with one click. There are sections of appear, emphasize, and disappear, from which the animation can be chosen.
How to Use Presentory and Make Presentation with 3D Models in Slides
This AI software holds numerous features to inspire the presenters and audience. It contains a user-friendly interface for people without skill sets. Read further and learn in a step-by-step process to use this AI tool and make a presentation:
step1Set Up Presentory For AI Presentation Making
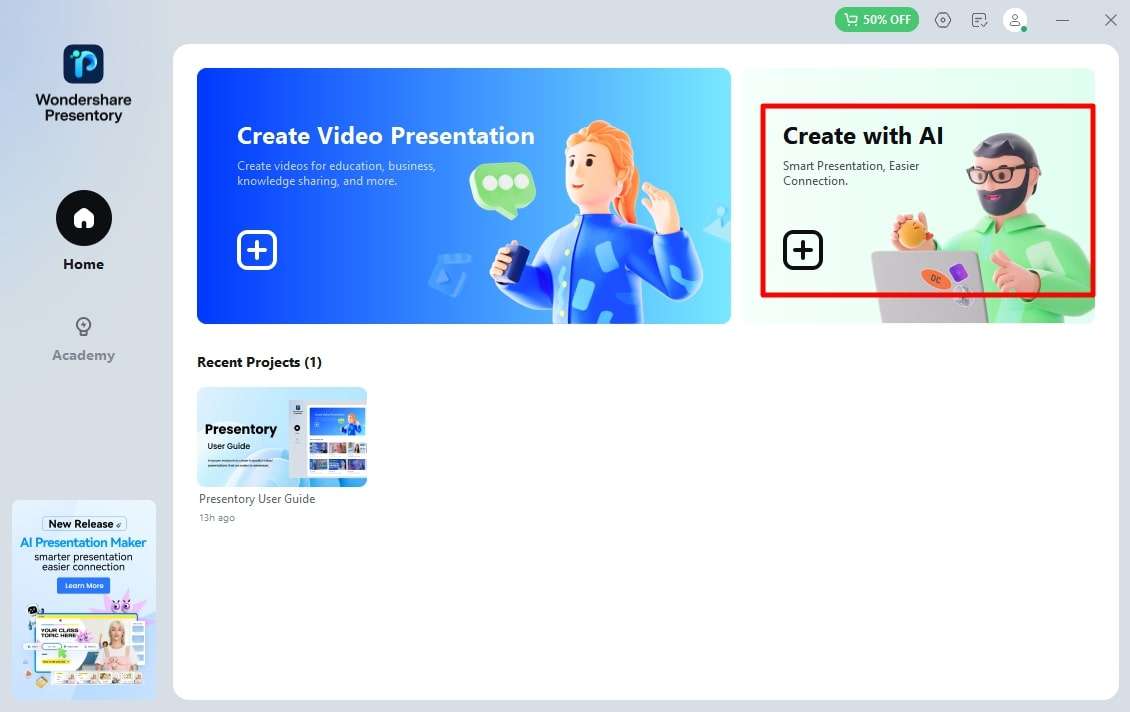
Download and set up Wondershare Presentory in your system. Double-tap on it and enter in its main interface. There, locate the “Create With AI” feature and press it.
step2Provide Topic For Presentation
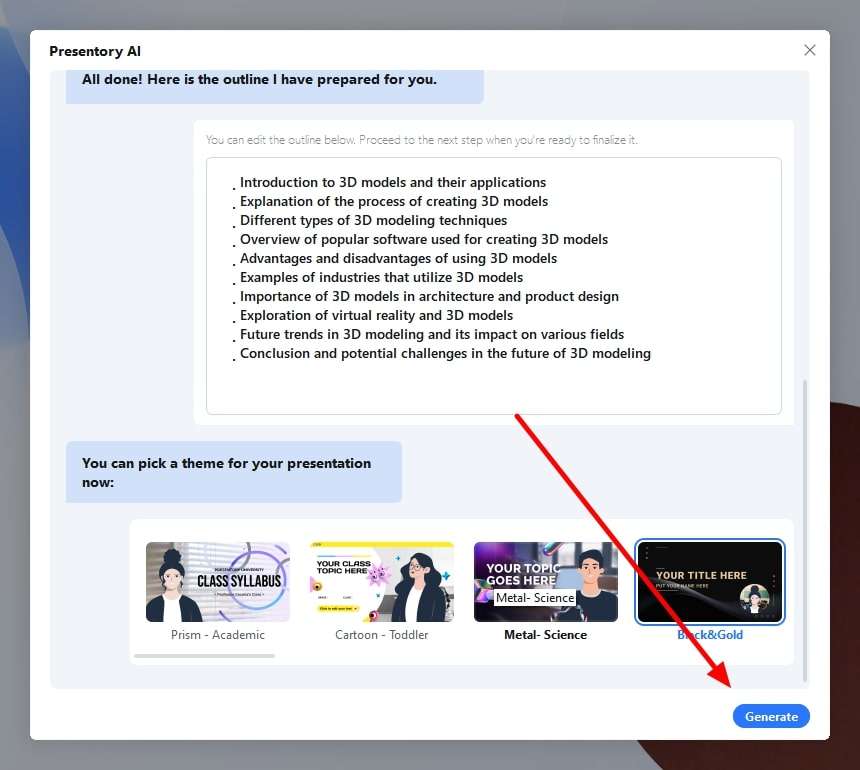
In the next window, you need to define what you wish to create in the presentation. Upon clicking “Other,” a search bar appears on the window. Insert your topic and hit the "Send" key using your keyboard. Afterward, there will be different template designs to choose from. Select any template and press the “Generate” button there.
step3Add Stickers To Enhance Presentation
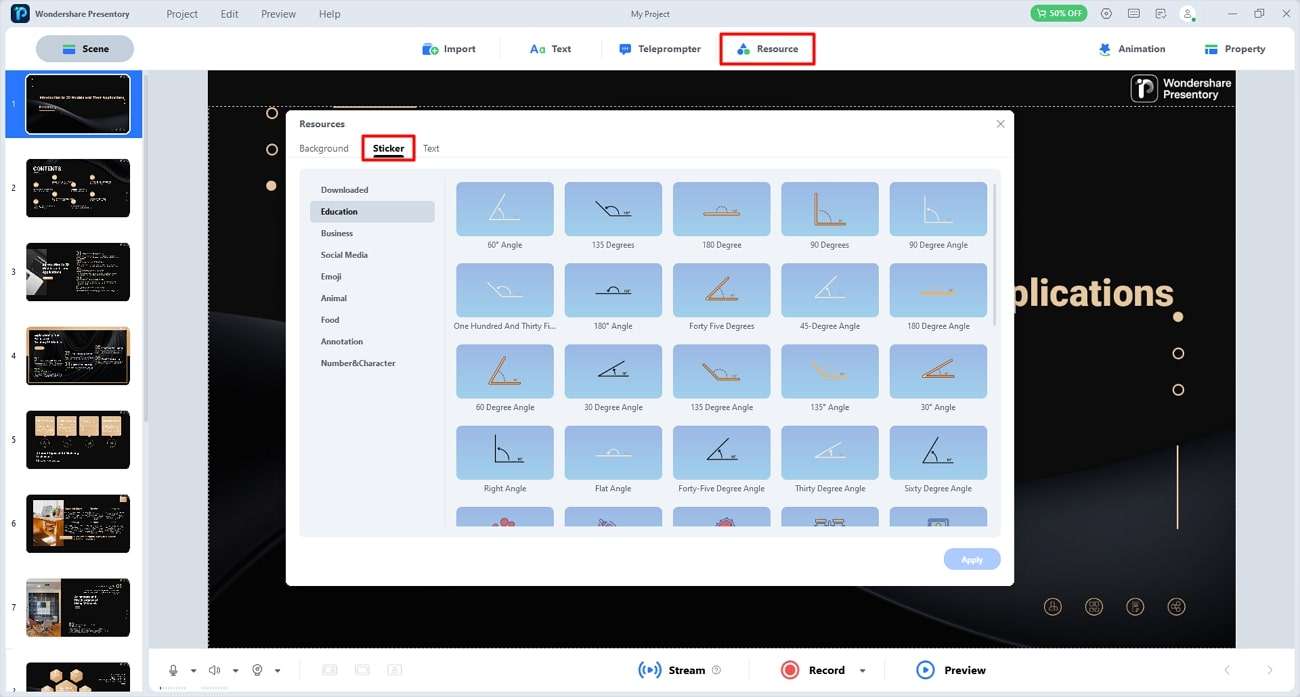
Presentory will start adding the content to the slides according to the template and presentation rules. Next, move to the top toolbar and press the "Resource" option. From the resources window, select “Stickers” from the given options. Later, scroll and choose any 3D model to get added to the slides.
step4Add Animations and Finalize Presentation
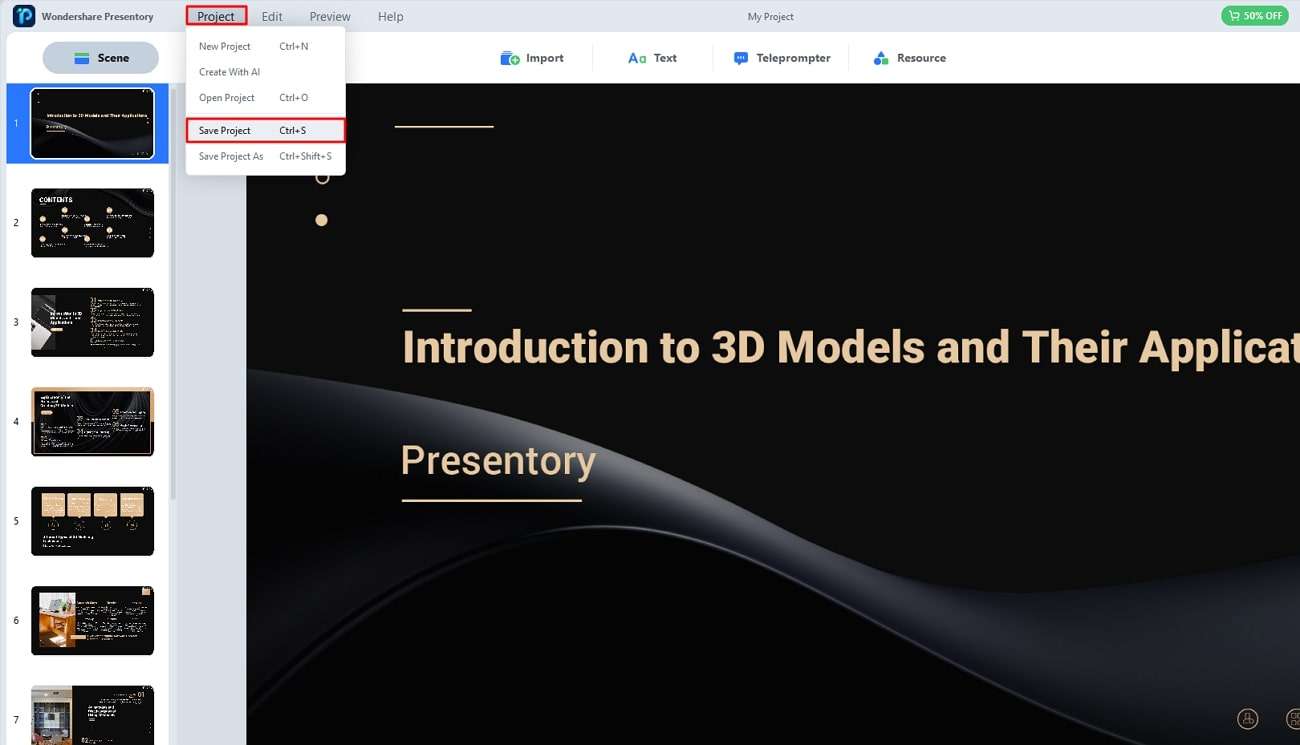
Lastly, you can customize the presentation by adding animations, transitions, or other resources. After making edits, move to the top toolbar and select "Project" there. From the drop-down menu, press "Save Project As," and another window will appear. Find the desired place in your system to save and locate your file. Later, click "Save," and your file will be saved in the system.
