Audio is an important element in video creation, and a video is incomplete without it. This is why it is important to convert PPT to video with sound. It not only enhances audience engagement but also liberates the presenter from manual efforts. There is no need for a remote to control the slideshow or speak loudly to reach everyone.
Converting PPT into video with sound increases its compatibility. This is because video formats, MP4, in particular, are accessible across platforms. You can stream it online, upload it on social sites, or play it on a projector. This article resolves the audio problem in video presentations using two methods. The first method uses PowerPoint's built-in feature, and the second involves an AI tool.
In this article
Method 1. Record Slide Show with Sound in PowerPoint
When you hear about presentation, the first word that comes to mind is PowerPoint. PowerPoint is one of the few tools performing its task with accuracy to this day. The online market is filling with add-ons to convert PowerPoint to video with audio. However, PowerPoint now has an innate feature with similar abilities. Here are step-by-step instructions for performing this function in PowerPoint:
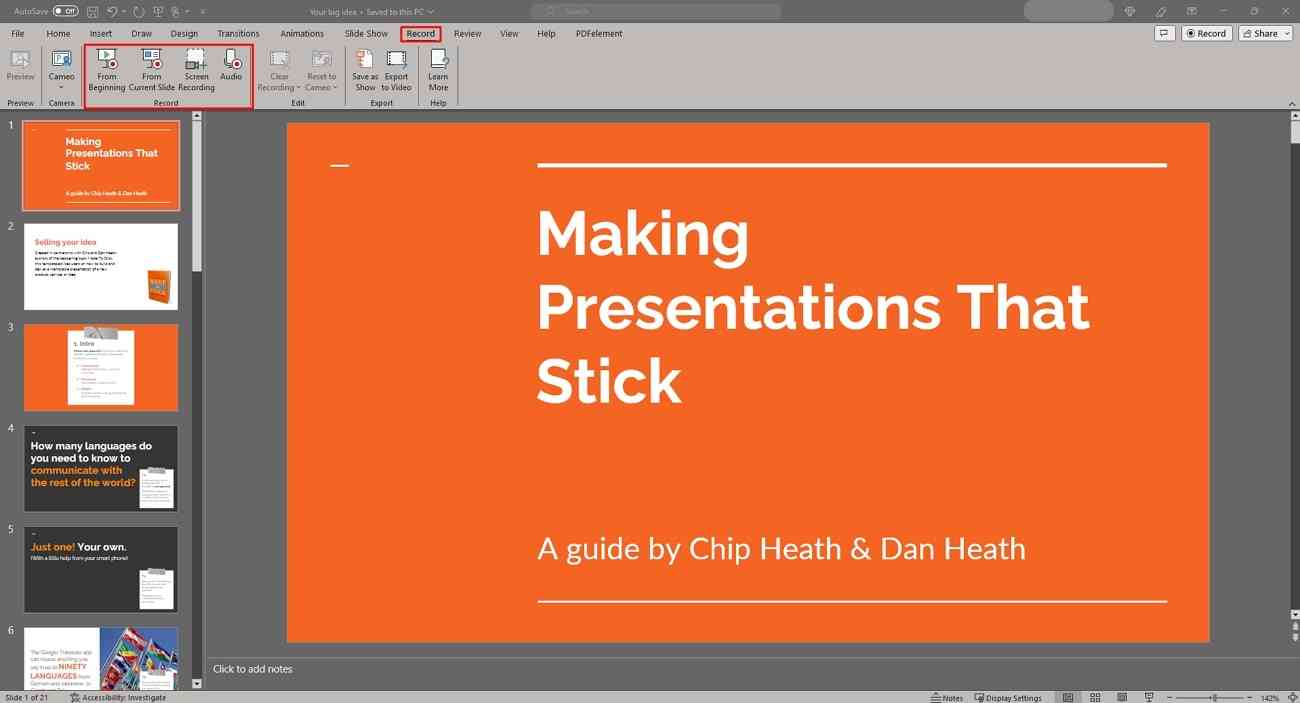
Step 1: Upon accessing PowerPoint on your desktop, import a presentation or create one. Using your cursor's pointer, navigate towards the "Record" tab in the top toolbar. Select it, and from the given options, click on the appropriate option asking to choose which slide to start recording from.
Step 2: A recorder window will appear, covering the complete screen for a better view. Adjust recorder settings from the bottom right corner of the screen. Enable the “Microphone” and “Camera” options to convert PPT to video with sound. By expanding the "Settings" option at the top, you can adjust audio and camera settings.
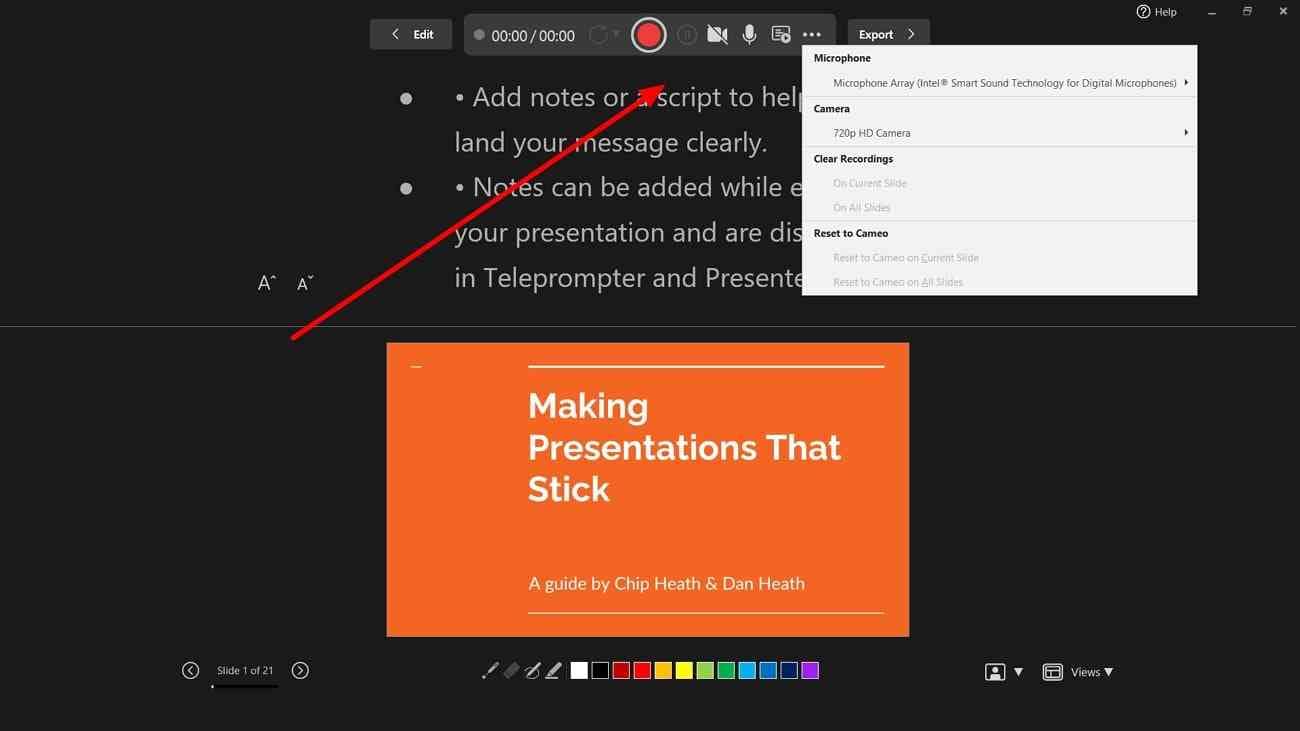
Step 3: Once you’ve made the adjustments, click the “Record” button at the top left corner. Once the countdown ends, the recording will start.

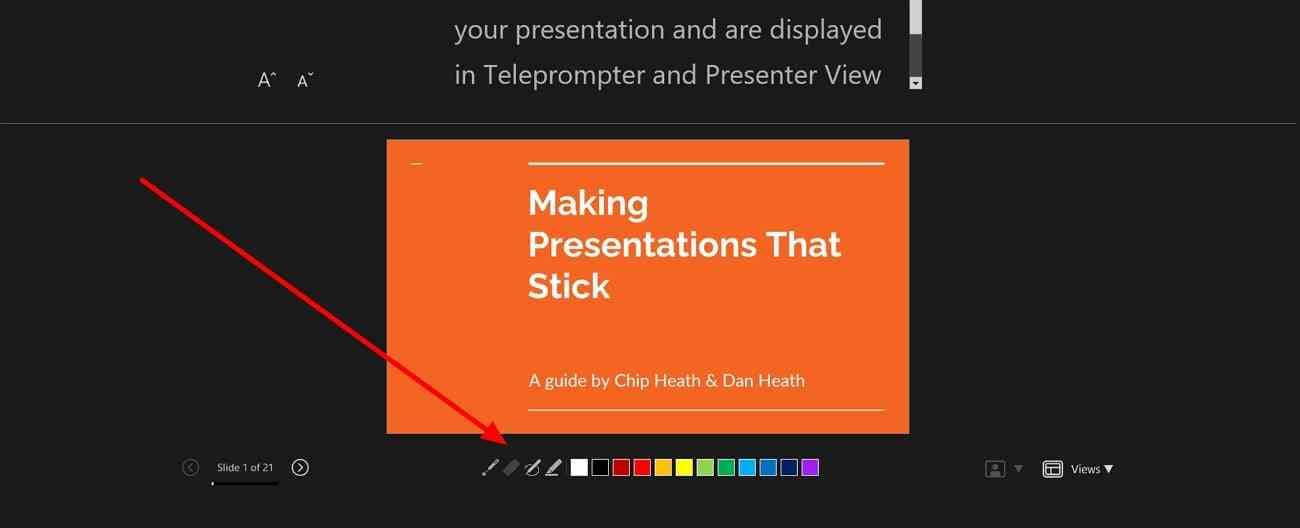
Step 4: At the bottom of your slides, you have annotation options. For instance, you can employ the "Laser Pointer" to point at something. You also have a "Highlight" to focus on key points. Moreover, you can use the "Draw" and "Erase" options if needed. You can also change the color of the pointer, draw, and highlighter using the given options.
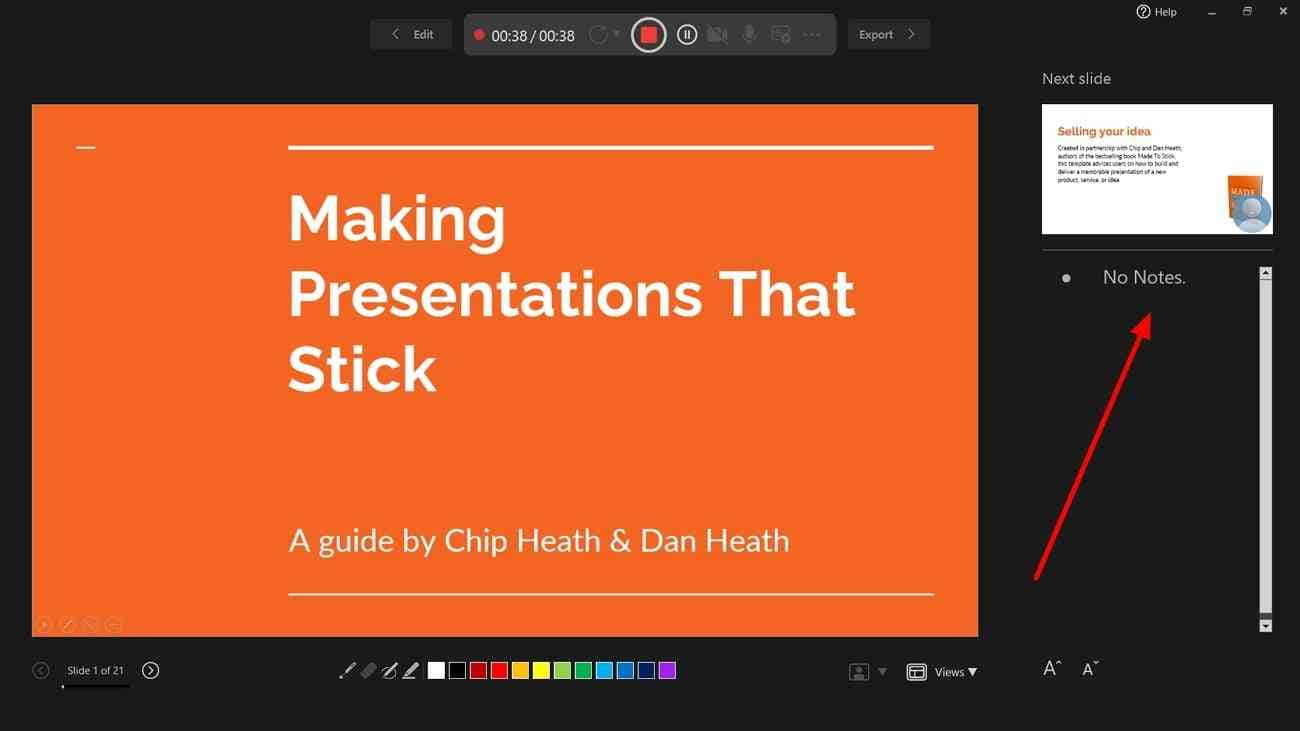
Step 5: While recording, you can take help from your notes to avoid memory lapses. You can either click on the "Notes" option or press "Ctrl + N" keys to use this feature. You can add separate notes for each slide, which will not feature in the recording.
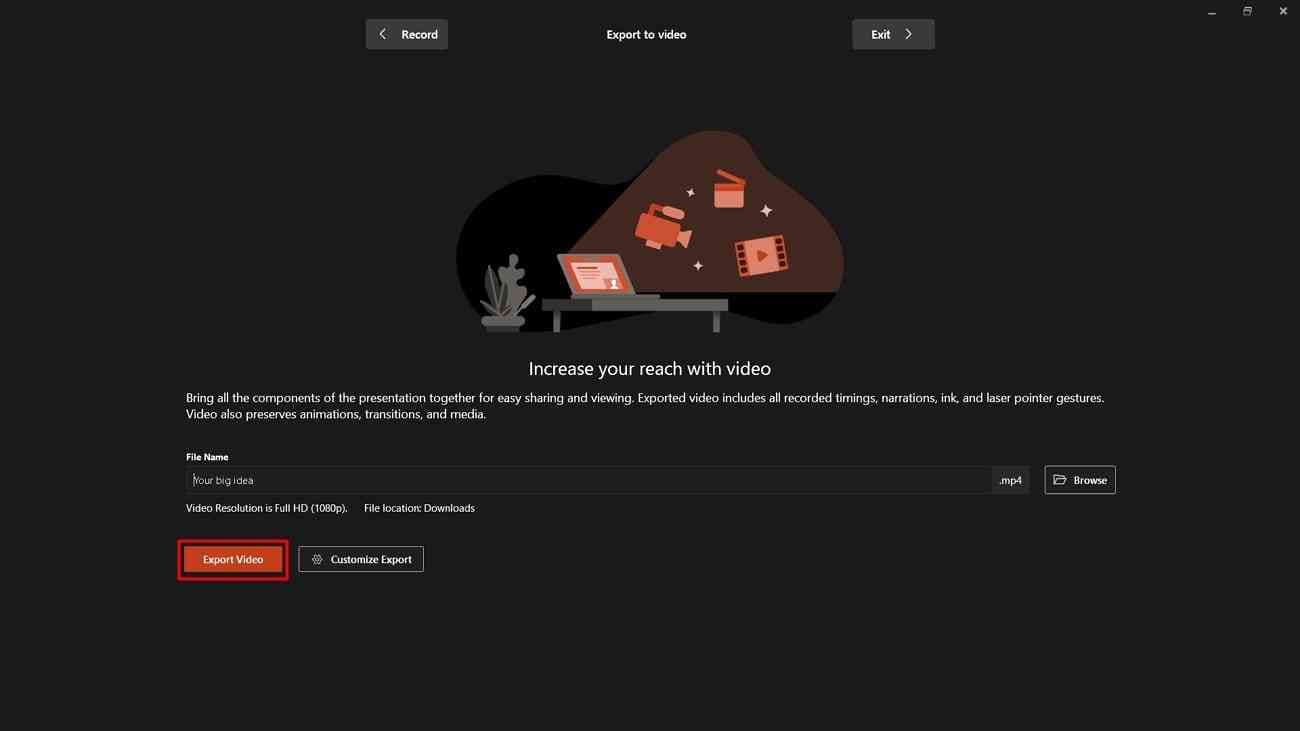
Step 6: Once the recording is complete, click the "Stop" button to end the process. You can click on the "Replay" button to see a preview of your PPT video with audio. After that, select the "Export" button from the top and continue to download the video to an appropriate source.
Method 2. Convert Your PPT with Sound Using Presentory
PowerPoint content gets great accessibility to platforms if we convert them into videos. It serves as an extra layer of protection for them and saves them from illegal edits or copies. The question is how we can quickly and easily convert PPT to video with sound. For this purpose, we need a platform to create, enhance, and convert PPT into video.
Thus, you should try using Wondershare Presentory as an all-in-one presentation maker. This built-in AI tool provides you with various powerful features in presentation-making. You can start creating projects from scratch or import PowerPoint to enhance its quality further. It makes presentation smarter and worldwide virtual connection easier.
Key Features of Wondershare Presentory
Presenters must discover this AI tool to fully utilize its influential features. So, let us provide a detailed description of this AI software's functionality below.
1. AI-Generated Presentation Outlines
Presentory can intelligently generate presentation content that fits your needs. It offers content categories like corporate training, courseware, and knowledge sharing. After choosing it, you are asked to insert a topic and a few details for your desired outline. You can finalize the text and add it in slides sparingly with automation. Otherwise, AI can regenerate the text with different prompts.
2. Streaming and Recording on Popular Platforms
Virtual connection across the globe has become a necessity in almost every field. Considering such needs, this AI platform enables a streaming option at platforms like Zoom. You can present video on the presentation slides by using the webcam. It allows you to enhance your appearance with beautification effects. Presenters can record training materials to share and display later.
3. Appealing Template Designs
This AI tool offers stunning templates on one platform instead of browsing different sites. Users can find a template related to their topic, or they can design projects themselves. There are templates like lines-corporate training, metal-science, and note-back to school. Also, you can import a PowerPoint, video, and images to visually boost your project.
4. Rich Resources and Visual Aids
Create an engaging and interactive presentation with this AI presentation maker. There are over 2,000 slide backgrounds, including classic indoor, color, and gradient options. Presenters can bring motion to projects through appear, emphasize, and disappear animations. It also contains stickers related to Halloween, education, business, transportation, etc.
5. Teleprompter to Boost Confidence
Lengthy speeches can get on the nerves of the presenters when it comes to public speaking. In this regard, there is a teleprompter where you can import your scripts. You can enable the play option for automatic scrolling of the text. It allows you to change the text size, color, alignment, and opacity for improved readability.
How to Convert PowerPoint to Video with Audio in Presentory
As we have discussed, the main functionalities of this AI-supported platform. Now, let us show you how to create a presentation and convert PPT to video with sound.
Step 1: Launch Presentory and Import PowerPoint in Create Video Presentation
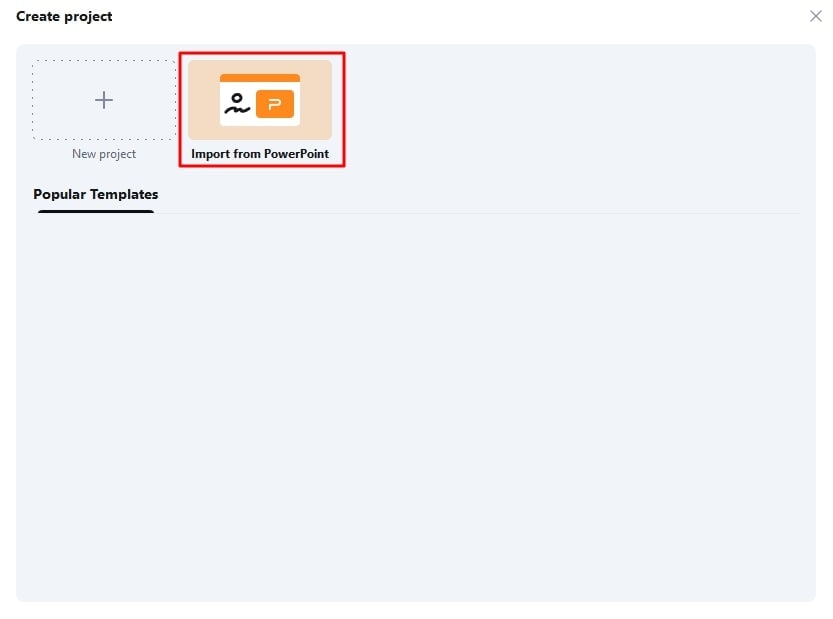
Access Wondershare Presentory and double-tap to launch it. Locate the "Create Video Presentation" option and select it to continue. From the next "Create Project" window, hit the "Import from PowerPoint" option. Now, find your presentation and press the "Open" button. You will get a PowerPoint in the project to customize further.
Step 2: Record and Edit Your PowerPoint Presentation with Sound
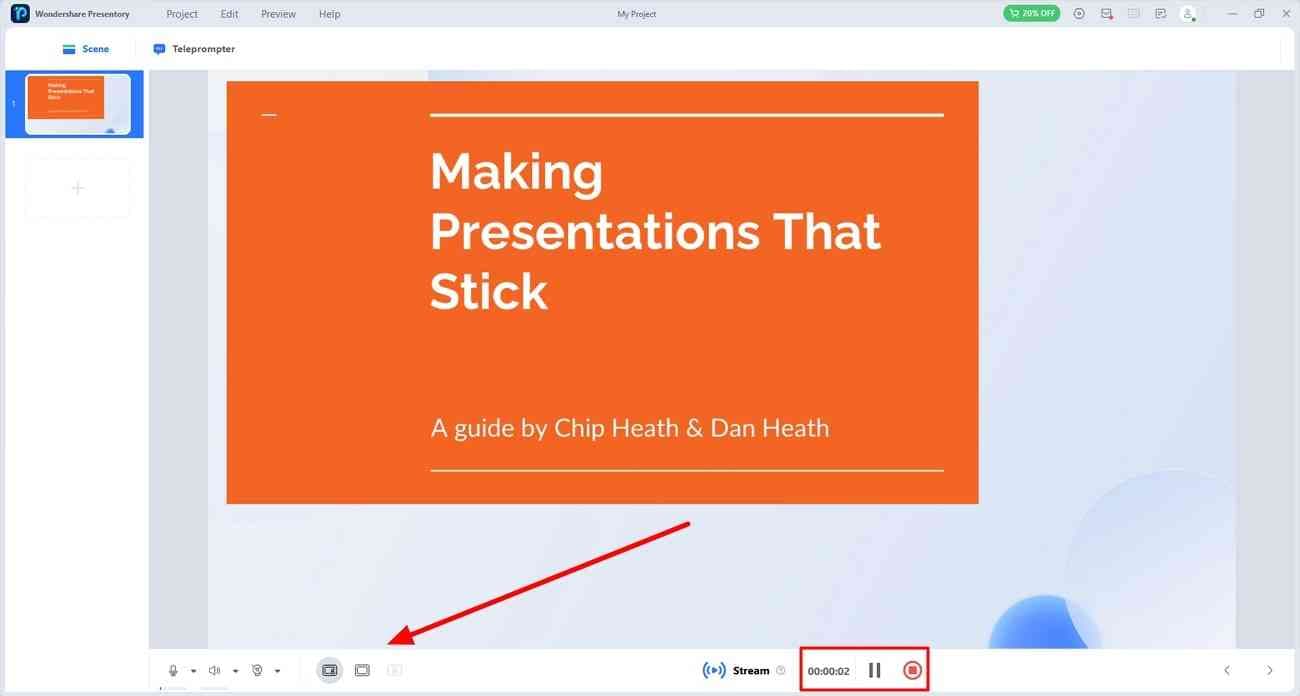
Afterward, set a layout of the webcam from the bottom toolbar frame icons. Then, tap the "Record" button and start presenting your content. After recording, press the pause icon to take a break or the stop icon to preview the video. You can trim the video by hitting the "Trim" icon in the "Preview Recording" window.
Step 3: Export the Converted Video File in Your System
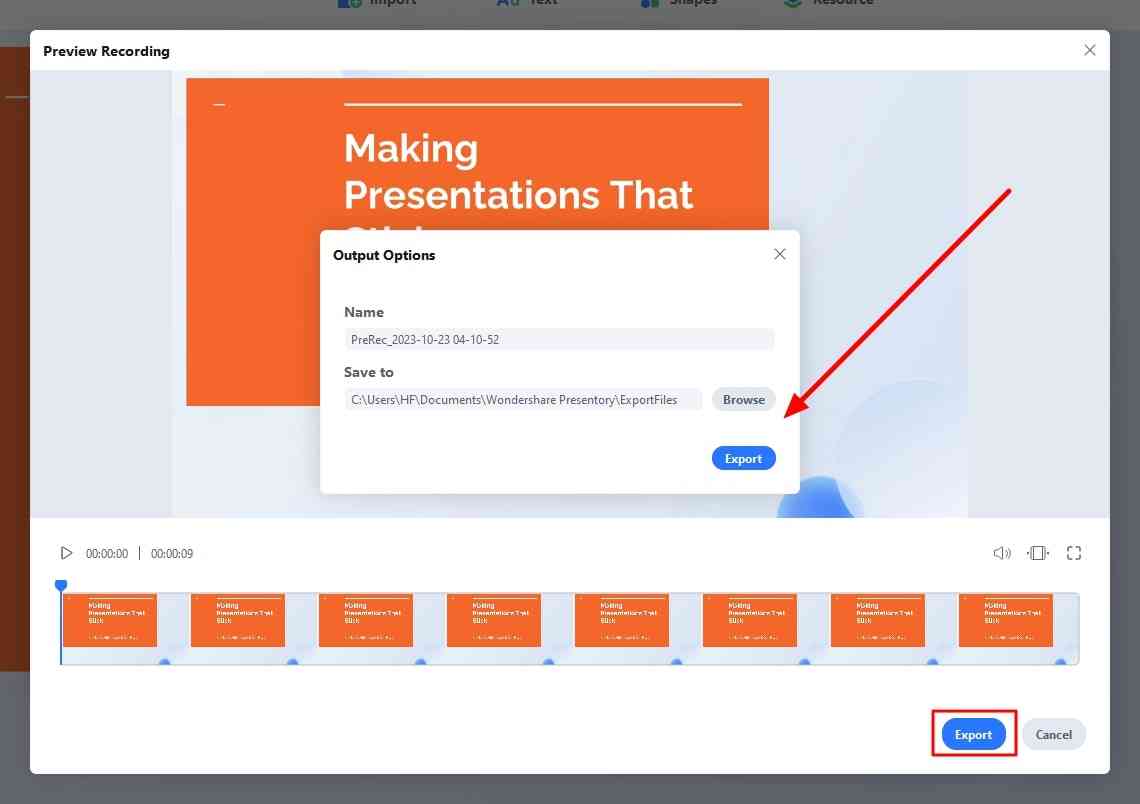
Head to the "Export" button after editing the recorded video. Now, assign a name to your project and choose the export destination in your system. Later, click on the "Export" button in that pop-up window. Wait a few seconds and convert PowerPoint to video with audio in your system.
Conclusion
If you have read this article, you have a brief knowledge of the topic. The article reviewed two methods to convert PPT to video with sound. The guide to employing these methods has been discussed in detail. Moreover, users learned about AI software that offers this functionality, amongst others. Wondershare Presentory is the perfect platform for performing PPT recording and enhancing it later.
FAQs
1. Can I export audio from PowerPoint?
Yes, PowerPoint does export the audio along with the video from PowerPoint. To employ this function, use your mouse to click the "File" tab and then "Save as." From the given options, choose a file format and click "Save." After the file export, you can play it and access the audio with the video.
2. How do you record yourself when presenting a PowerPoint?
It is simple to record yourself in PowerPoint during a presentation. From the top toolbar, hit the “Recording” tab and click the “Record Slide Show” option. Upon reaching the recorder window, click your keyboard's “Ctrl + K” keys. Moreover, you can locate the “Turn on Camera” option at the top to click.